What About Watermarks

Would you like to be able to tag your documents as a draft or label them as confidential? Watermarks may be the answer for you! A watermark is an image printed in the background of a copied or printed page. You can also use watermarks to put a version number or a date on a document. There are several predefined watermarks to use, or you can even create your own. The watermark is a handy feature on many of our printers and multifunction printers including the Nuvera® Digital Printing Presses, VersaLink® and AltaLink® products.

Watermarks are a visual representation to let you know you are working, for instance, with a draft version of a document. This is helpful for documents that are printed out multiple times for editing and revising. Watermarks can also be used to put your name on a document you created so that no one else can take credit for your work.

Take a look at this video of how to create a watermark on the Xerox® VersaLink® C405 Color Multifunction Printer.

Watermarks are a simple way to secure your confidential or intellectual property. The marks can be customized; you can choose the size, orientation, font and even color of the watermark to fit your needs. Watermarks are a great security feature because they cannot be removed or manipulated, as you might be able to do with a header or footer.

Note:

  • Not all options listed are supported on all printers. Some options apply only to a specific printer model, configuration, operating system, or print driver type.
  • Watermarks are not supported for some print drivers when booklet is selected or when more than one page is printed on a sheet of paper

Watermarks can also be added to copies on some of our machines. Standard watermarks available for copies include the words draft, confidential, the date and time, a control number, or a watermark of your own creation.

To learn more about watermarks available on Nuvera® Digital Printing Presses, check out this link to the instructions. For instructions for other printer models, search for “watermark” in Online Support. Enter your printer model number, then type “watermark” in the search field. Watermarks are also available through the Xerox Global Print Driver.

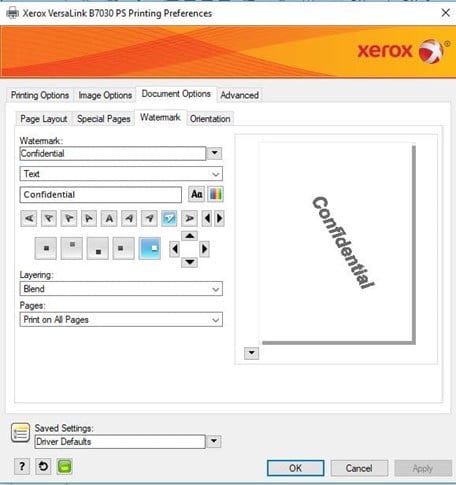
Below is a screenshot of the watermark editor on Windows drivers.

Remember your screens may vary depending on your model of printer and how your print job is set up, so this screenshot is only an example. “Example”, another good watermark word!

It’s Fall Cleaning Time

It’s fall and many schools in North America are back in session.  After limited use over the summer, your Xerox product(s) may need a little TLC. Whether you are in a school or a business, keeping your printer clean is important. Several image quality problems can be avoided or solved by cleaning your printer.

Some of the most common issues – lines, spots, streaks, voids, deletions on copies or scans — can be caused by dirty platen glass, constant velocity transport (CVT) glass or print heads (LPH). Clean these once a month, or whenever image quality issues arise.

It is a good idea to familiarize yourself with all the machine’s cleaning procedures. Go to the Online Support page for your model and search on the term “clean.” There you will find several items that you can take care of quickly and easily yourself. Printer models vary on what you can clean so make sure you refer to your printer documentation or Online Support resources to see what you can do.

Please see this article from the Online Support page for VersaLink® printer models regarding how to clean the scanner (xerox.com).

Many printer models have support built in that you can access from the touch screen on the printer.  That way you can read the instructions or view the ‘how to clean’ information right at the printer.  

You can also visit the YouTube Xerox Support  channel to help walk you through the process. Remember to subscribe as there are new videos added daily!

Below is a video for cleaning the print heads (LPH).

Happy cleaning.  Here’s to a fresh, clean start to fall!

How to Orchestrate Your AltaLink® Fleet

We recently discussed how to create a clone file which can be used as a backup file or to clone configuration settings from one printer to another printer. It’s useful for standardizing settings across all your like-model devices, including to implement a security policy. But what if you have many such devices, maybe even hundreds across your business where you would want to standardize settings?

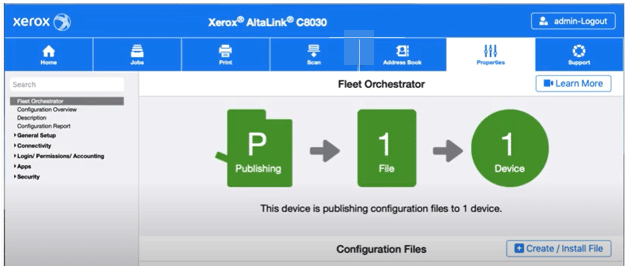
That’s where the Fleet Orchestrator comes in! Fleet Orchestrator is a feature available on the AltaLink® family of printers. The Fleet Orchestrator feature allows you to efficiently create, install, and share clone files across many devices.

After you configure one device, you can distribute all configuration settings, or a subset of settings, to other devices. And lest you’re concerned the settings will get out of sync quickly and you’ll be back to square one, part of the process is to set up a schedule to share configuration settings regularly and automatically, keeping the printers aligned without manual intervention.

Watch these videos on our Xerox Support YouTube Channel to see what Fleet Orchestra is about:

The basic steps are:

  1. Establish the relationships between the printers, i.e. which one is the Publisher and which are Subscribers. This is called a Trusted Community. Printers can be both a Publisher and a Subscriber in a tree structure which allows subscribing devices to spread out the work of downloading files throughout the tree, rather than relying on a single publishing device. 
  2. Create the file you want to share. This is choosing the configuration settings that you want all devices to have. You can choose all configuration settings or a subset of them, for instance just security policy related settings.
  3. Set up the cadence for sharing. This ensures these settings stay synchronized across all printers in the Trusted Community.

There are several other resources to help you set up and use the Fleet Orchestrator:

Open your device’s embedded web page1. Select the Properties tab, then Fleet Orchestrator. At the bottom of the screen there is a help link which opens the help system contents and the ‘Learn More’ pages for Fleet Orchestrator. The ‘Learn More’ section provides instructions, a glossary of terms and troubleshooting tips. 

Hopefully you are recognizing what a powerful feature the Fleet Orchestrator is. Besides sharing clone files to keep settings aligned across your devices, Fleet Orchestrator also provides a way to distribute software updates and 1-Touch Add-on files. It can be a game-changer if maintaining consistency across your fleet is important to your business. We hope you ‘join the orchestra’ for effortless printer setting management!

1 Note: To open the device’s web page, open a browser window on your PC and enter the IP address of the printer.

Cloning Your AltaLink® or VersaLink Printer®

Did you know that you can create a clone of your Xerox AltaLink® or VersaLink® printer? Well, you may not be able to create a whole new printer, but you can create a clone file which provides a number of benefits that may be just what you’re looking for.

A clone file can be used as a backup file. If your machine requires a service action that would clear the settings of your printer, the clone file will give you a way to quickly restore your settings, address books, and other specific information. Having a backup can save you a lot of time and frustration if you ever lose your settings.

The cloning feature can also be used to clone configuration settings from one printer to another printer of the same model and system software version. Note that settings that are unique to a configuration, such as IP address, are not included in the clone file.

Consider also these possibilities:

  • To standardize general device settings across a group of devices, create a clone file that contains configuration settings from one device.
  • To standardize security settings on all your devices, create a clone file with a set of specific settings, such as security policies.

If you have an AltaLink® B8000 or C8000 series printer, check out this short video for how to create a clone file.

There are also resources at online support with step by step instructions.

  1. Select your printer model
    1. Under ‘Browse by Product Type’, select ‘printer’
    1. Choose AltaLink® or VersaLink®
    1. Choose your particular model
  2. Search using the term ‘how to clone’

For instance, view the instructions for how to clone a device for the AltaLink® C8000 family and EC8036/ EC8056 models here. For VersaLink® B400 and B405, view these instructions: Create or Install a Clone File.

Many printer models have this feature enabled by default. If it is not enabled on your device, refer to the System Administrator Guide at online support for instructions. After selecting your printer model, search using the term ‘system administrator guide’ and select the documentation tab. Enabling and configuring the cloning feature occurs at the printer’s embedded web server which is accessed by opening a web browser on your PC and entering the printer’s IP address.

You can create and install a clone file using the embedded web server. AltaLink® models also have the option to create and install clone files using a USB flash drive.  The USB flash drive option is available only for AltaLink printers at certain versions of system software.

It is important to determine the version of software that is currently installed on the device to select the correct set of instructions for either of these options. Click here for instructions for finding the software (firmware) version installed on the printer.

What could be better than cloning? The Fleet Orchestrator! The Fleet Orchestrator is a feature which allows you to more efficiently create, install, and share clone files across many devices. You can even set up a schedule for automatically re-aligning the settings in case of any changes. We’ll tell you all about Fleet Orchestrator next time!

Managing Printers Across a Distance – Part 2

Today we will be looking at another way you can work with your printer from afar to save the time and energy it would take to go to the printer’s location. The Remote Control Panel is a feature on VersaLink® and AltaLink® models, as well as most of the ConnectKey family of printers and multifunction devices. It allows you to communicate with the printer over the internet or intranet using a web browser on your computer. System administrators find this feature especially useful for assisting or training printer users.

Use the Remote Control Panel to view the device touch screen, see the status of jobs in queue or change settings in the tools area. Any changes to the settings are saved in the same way as if they were changed at the device touch screen. The Remote Control Panel is useful for troubleshooting and may be used by your system administrator or Xerox support team to clear a fault or provide assistance.

When you open the Remote Control Panel, anyone standing at the device will see the actions you perform on the touch screen. They can also use the touch screen to override your selections. You can configure the Remote Control Panel so that the touch screen at the device is blocked while you are using it. When the touch screen is blocked, the user at the device will see a message on the touch screen: ‘Remote Session is active. Local Control Panel is not available’. When you close the remote session, the touch screen will be available to use again. Only one person can open the Remote Control Panel at a time.

Many printer models have this feature enabled by default. If it is not enabled on your device, refer to your device’s system administrator guide at online support for instructions. Select your printer model from the Browse by Product Type section, then select the documentation tab to find the system administrator guide. Enabling and configuring the remote control panel occurs at the printer’s embedded web server which is accessed by opening a web browser on your PC and entering the printer’s IP address. Permission for use of the Remote Control Panel can be restricted to the administrator only or you can allow permission to other users as well. 

Below are several links for accessing or configuring the remote control panel:

AltaLink® C81XX Family: Use the Remote Control Panel Feature

AltaLink® B81XX Family: Enable, Access and Use the Remote Control Panel Feature

VersaLink® B400 / B405, VersaLink® B600 / B610, VersaLink® B605 / B615, VersaLink® C400 / C405, VersaLink® C500 / C600, VersaLink® C505 / C605: How to Access the Remote Control Panel Feature

VersaLink® B70XX and C70XX Families How to Configure the Remote Control Panel Feature/ Configure User Access and How to Use the Remote Control Panel Feature

WorkCentre® 7800 Series: Access the Remote Control Panel

The Remote Control Panel is an interactive, real time interface to the printer.  With this tool, you can make changes to settings just as you would if you were standing at the printer and using the touch screen.  System administrators can program the printer and troubleshoot issues from their PC, even if at a remote location. Additionally, the remote control panel can be used to train users or walk them through a print, fax or scan set-up.

The Remote Control Panel is a tool that allows users to get help quickly and remain focused on the business of their work. See if it is something you can use to save time and improve your work processes!

Managing Printers Across a Distance – Part 1

They say distance makes the heart grow fonder. Could that apply to the printers we use on a regular basis? Doubtful. The adage likely does not translate to the printer technology in our lives. Instead, we would prefer to have our printers closer to us.

You may be working near the printer that you use on a regular basis. Or you may be down the hall or across the building from it. Those of you managing printers for a group or division within your organization may be responsible for printers that are spread across the campus or on the other side of town. How convenient would it be to see what is going on with these printers, make changes to them and assist other users without having to leave the comfort of your office?

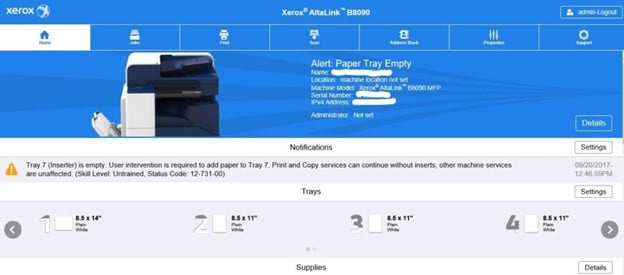
Networked Xerox printers and multifunction devices have an embedded web server (EWS) which allows users to perform many functions such as check the printer status, check paper tray and consumables levels, make changes to the configuration and feature settings and more.

Below is a screenshot of the embedded web server home page for AltaLink devices.

The printer must be networked, not USB connected, and requires a TCP/IP connection between the printer and the network.

To access the embedded web server, known on many models as CentreWare Internet Services (CWIS), open a web browser on your PC or tablet and enter the IP address of the printer. You can find the IP address on the printer’s local user interface or on the settings/system configuration report. This is something you will need to obtain while at the printer itself or via communication with someone near it who can assist you. You can view a brief video at this link for how to find the IP address of your AltaLink device at the local user interface.

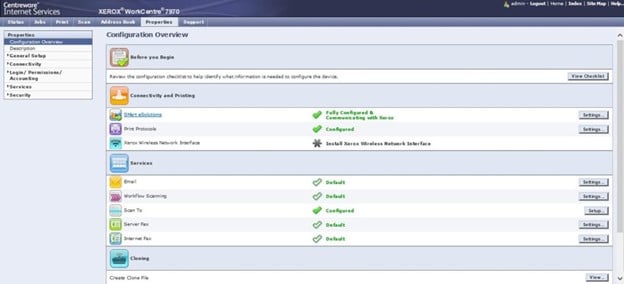
Printer models which have CentreWare Internet Services as their embedded web server have screens which look similar to this screenshot for the WorkCentre 7970 (Properties tab):

At the embedded web server screen, you will see several tabs and categories of features that can be configured. You can enroll the printer in remote services to have it automatically send meter reads for billing purposes and supplies levels for automatic supplies replenishment, if available with your Xerox contract.

Upgrading printer firmware can also be performed at the embedded web server. Some changes may require the administrator’s password. The steps for accessing the EWS as an administrator can be viewed in this knowledge article for the VersaLink C400 series printers. Be sure to follow the policies of your IT department before making changes.

Learn more about the features and capabilities of your printer at the embedded web server by searching “web server” on the support page of your product model. It will bring your printer as close to you as your PC or tablet. If it saves time, energy, and extra steps it will be well worth it!

Scan to PC Using SMB

Scanning a document and sending it via email to your PC for saving is one way to capture a hardcopy document digitally and storing it on your PC. But there’s a better way to do that. Why not scan right to the folder on your PC where you would like the document to be? This process is scanning using the SMB protocol, or Microsoft Server Message Block.

There are 3 high level steps to this process.

  1. Set up a folder on your PC and enable it for sharing.
  2. Configure the printer to recognize this folder as a destination.
  3. Scan documents to the folder.

Steps 1 and 2 are one-time actions. Once those are established, you can use the scan to PC (SMB) feature whenever you need to deliver a document to your PC folder. For routine processes, this can be quite a time saver!

Let’s look at each step.

Set up a Shared PC folder

The instructions for this step are outlined on page 103 of the VersaLink B405 mulitifunction printer user guide. These steps can be used regardless of the Xerox printer model you have as this step is performed at your computer.

Configure the Printer

There are two options for where to make the printer changes which will allow the printer to recognize the shared PC folder as a scanning destination. One is at the printer user interface and the other is via the embedded web server.

Below are instructions from the VersaLink B405 mulitifunction printer user guide. These steps are also shown in this Xerox Support video.

Adding an SMB Folder as an Address Book Entry from the Embedded Web Server

1. At your computer, open a Web browser. In the address field, type the IP address of the printer, then press Enter or Return. Note: If you do not know the IP address for your printer, refer to Finding the IP Address of Your Printer in the printer User Guide.

2. Click Address Book, then click Add Contact.

3. For Network (SMB), click the plus icon (+), then enter the following information:

  • Nickname: Enter the name that you want to appear in the Address Book.
  • Type: Select the network connection type.
  • IP Address: Port: Enter the IP address of your computer, then enter the default port number.
  • Share: Enter a name for the directory or folder. For example, to save scanned files to a shared folder named scans, type scans.
  • Document Path: Enter the path of the folder on the SMB server. For example, to save the scanned files to a folder named colorscans inside the scans folder, type colorscans.
  • Login Name: Enter your computer user name.
  • Password: Enter your computer login password.
  • Retype Password: Enter your login password again.

4. To save your network information, click OK.

5. To save your contact, click OK

Scan Documents to the Folder

This is the really easy part! You can scan your document as usual but now you are selecting your folder from the contacts list on your printer. Below are instructions from the VersaLink B405 mulitifunction printer user guide.

Scanning to a Shared Folder on a Networked Computer

1. Load the original document on the document glass or into the duplex automatic document feeder.

2. At the printer control panel, press the Home button.

3. Touch Scan To.

4. Touch Contacts.

5. From the Contacts list, select the shared folder.

6. To save the scanned document as a specific file name, touch the attachment file name, enter a new name using the touch screen keypad, then touch Enter.

7. To save the scanned document as a specific file format, touch the attachment file format, then select the needed format.

8. Adjust scanning options as needed.

9. To begin the scan, press Scan.

10. If you are scanning from the document glass, when prompted, to finish, touch Done, or to scan another page, touch Add Page.

Note: If you are scanning a document from the automatic document feeder, a prompt does not appear.

From this point you can scan to your shared PC folder whenever needed.  Find out more about SMB scanning by searching on the support site for your particular Xerox model or by searching for SMB on the Xerox Community Support Forum or Xerox Support YouTube channel. If you have additional questions you can post on the Forum site or contact your local support center.

Paper and Humidity

We are happy that it’s summertime with all the joys that brings. It also brings heat and humidity, at times at very high levels. Many people enjoy the heat and look forward to it as they plan for time on the beach. Even high humidity doesn’t deter some folks. That’s not the case for printer paper when it is being stored. High humidity can have a negative effect on paper that will impair your ability to get good prints.

Paper Storage Explained:

Paper is highly sensitive to moisture and the humidity levels within which it is stored. When paper is manufactured, most manufacturers produce paper to strict quality standards including a well-regulated level of humidity of between 25-50%. The paper is then carefully sealed into packaging that contains a special lining for maintaining the humidity level of the paper for as long as it is properly stored. It is then loaded into cases and onto wooden pallets with an even surface for shipping to the customer. Paper shipped in this condition is perfect for xerographic applications, but the freshness of the paper is dependent upon the conditions when stored, waiting to be used.

As paper is made of wood fibers, it exhibits similar behavior as other paper products such as paper towels. As a result, paper that is improperly handled or stored, can be subject to excess moisture from the atmosphere, which can cause the paper to increase in size, warp, curl or stick together.

Paper Storage Issues:

Paper with moisture issues can lead to the following issues:

  • Damp paper can warp in tray – Paper that has absorbed too much moisture from the atmosphere can begin to become wavy or warp, starting around the edges of the sheet. Warped paper can jam in the paper tray when attempting to feed from the tray, causing a misfeed, and cause wrinkles during the printing process.
  • Dry paper can also warp in tray – Paper that has lost too much moisture can contract around the edges of the sheet causing “tight edges”, which can lead to misfeeds, jams, registration issues as well as wrinkles.
  • Damp paper can wrinkle in the paper path – Slightly deformed damp paper can lead to paper wrinkling in the paper path. This can result in wrinkled output, paper jams and lines in prints.
  • Damp paper can affect toner bonding to paper – Damp paper can lead to poor toner application to paper and poor fusing, such as light/faded output, smudging or toner rubbing off the page.
  • Damp paper may curl – Damp paper may curl more than normal paper would, resulting in curly paper output, or increased instances of misfeeds and paper jams.
  • Damp paper may adhere to other sheets – Damp paper may stick to neighboring sheets of paper, becoming difficult to separate and cause misfeeds and jams when multiple sheets of paper are pulled into the printer at once.

Paper Storage Considerations:

Please read this knowledge article which includes paper storage guidelines for the AltaLink C8030/ C8035/ C8045/ C8055/ C8070 printer family and EC8036/ EC8056 multifunction printers:

For all product models:

  • Keep paper in its original packaging until ready for use – Paper is packaged in a wrapper lined with polyethylene plastic that is resistant to moisture and maintains the moisture level of the paper inside the package. Also, keep unopened packages of paper stored inside their original cardboard carton whenever possible. Reseal the package if using only a portion of it.
  • Do not store paper on or near the floor – Keep the paper away from environments that experience extreme temperature and humidity shifts. Do not store paper flat on the floor as this increases chances of moisture being absorbed into the paper.
  • Store paper in a storage cabinet or flat shelf – For paper storage, always keep unused paper in a dry, flat storage cabinet where it can be protected from physical damage and the elements. Always stack the paper evenly on top of the other to avoid curling, bending or damage to the corners of the paper.
  • The storage location should be climate controlled – The storage location should also be kept within 68°F/20°C to 76°F/24.4°C and within 35-55% humidity levels for best results. In damp or humid environments, paper, even the paper already loaded into the paper trays, can absorb moisture from the air and become too damp to use.
  • Paper must be conditioned before use – If the paper cannot be stored in a climate controlled environment or has not been stored this way, the paper must be given a conditioning period before use in accordance to the temperature and humidity levels at which it was stored. For example, a carton of paper stored in a 57.2°F/14°C storage room, brought into a 72.5°F/22.5°C production room must be conditioned for 8 hours before use for best results.
  • Use only the amount of paper needed in the tray – When loading paper into the printer, load only the amount of paper that the job requires or that will be used in the short term. Paper inserted into the paper trays will absorb moisture from the atmosphere over time, which can lead to the many damp paper issues listed above.

If you experience one or more of the symptoms described above – paper curling, jamming, paper sticking together – the answer just may be to remove the paper in the paper trays and replace it with a newly opened package of paper that has been properly stored. Humidity levels may have damaged the paper in the trays.

Enjoy the summer and the summer weather. And don’t let it ruin your prints!

Configuring Configuration Reports

Configuration reports, sometimes referred to as settings reports, offer much-needed information about your printer or multifunction device. The report provides a listing of the settings on your machine with the details for each. The report also includes the version numbers of the software / firmware on your device. You may need this information for troubleshooting or for reference after changes are made to the system.  We recommend that you periodically print out a configuration report so that you have an up-to-date report on hand for reference. We have observed on the Customer Support Forum that some people would like to know how to stop the report from printing automatically when the machine is powered on. Some machines may print the report every time the machine is powered on as a default.  This may not be the best option for your work environment.

You can disable printing the configuration/settings report at power-on either on the machine itself or through the embedded web server for the machine, titled CentreWare Internet Services (CWIS) on many printer models. The instructions for disabling this feature are available on the support page for your printer model.  Search on “configuration on startup” to find the solutions for disabling it. You can also find the solution for how to print the configuration/settings report when you need it by searching on “configuration report” on the support page for your printer.

Most of the reports offered by the printer can be controlled from the control panel of the machine or through CWIS.  To find information on controlling other reports, search on “report”.  If you are unable to find the information you need, you can always ask for help from other Xerox printer and multifunction users on the Customer Support Forum or by contacting your local Xerox support team.

Print out a current configuration report and keep it near the printer. Then find out more about the other reports that are available. You may just find some useful information!

Addressing Image Quality Issues

Image quality issues can be caused by different things. To find out what may be causing the problem, first determine what process you are using when you see the issue. If the defect is only seen on copies, that is a different issue than if you see the issue only on prints.

If the image quality issue only happens when you are making a copy, the problem may be with the glass that the original travels over to make the copy. Clean the scan glass on the machine if it is accessible.

If the image quality issue happens when you print, try printing an internal report from the machine like the settings or configuration report and see if the defect shows on the report. If the internal report is fine with no defect or error, the problem is with the original file or document. Try printing a different document from a different program to confirm.

You can look up information on print quality issues via online support for your machine. We break down the solutions for image quality issues that happen on copies, prints or both. Sometimes you will see image issues at a regular interval like every 1 inch or some other interval. These, too, are covered in the online support. Another component of image issues is whether they are horizontal or vertical lines, bands, dots, or deletions.  See this quick video that addresses repeating defects.  This video is for Xerox WorkCentre® 7435/7535/7830/7970i but the steps and procedures are similar on most Xerox printers.

Many image quality issues can be solved without having to make a phone call for assistance. Identify the applicable components for your issue to help you narrow down the potential cause of the image issue, such as what direction it occurs and if it is at a regular interval. Then search for solutions online, follow the solutions steps and you will be back in business.