Need to Routinely Print the Same Document? We have a Saved Jobs Feature for That

Do you have print jobs that you use often? For instance, do you regularly print a form or an information sheet to provide to customers or clients? Did you know that you can store print jobs on your printer or multifunction device to be reprinted at a later time? With the Saved Jobs feature, there is no need to go to a PC, open a document, set the settings and send it to the printer. Just save it at the printer and print it with the predefined settings whenever you need the document.

To use the saved jobs feature it may have to be enabled on the printer using the Embedded Web Server (EWS) or CentreWare Internet Services (CWIS). To find instructions for enabling and setting up the saved jobs feature navigate to the support page for your specific model of printer or multifunction device and search on the term saved job.

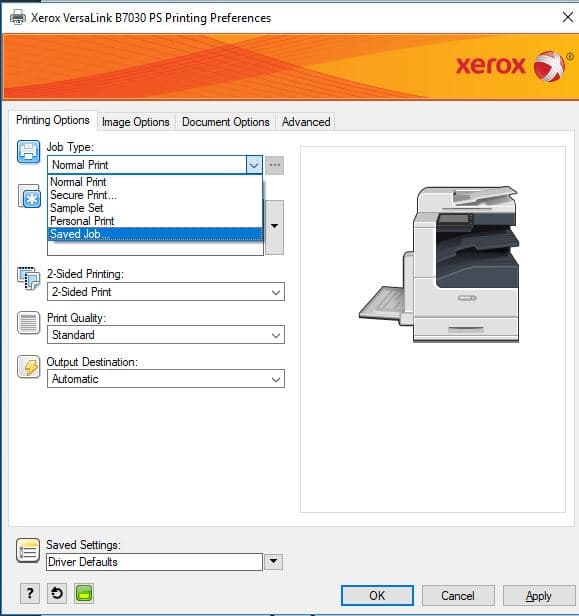
Once the feature is enabled you can print and/or save print jobs so that they can be printed later. To save a print job:

  1. At your computer, in your software application, access the print settings. For most software applications, press CTRL+P for Windows or CMD+P for Macintosh.
  2. Select your printer, then open the print driver:
    • For Windows, click Printer Properties. Depending on your application, the title of the button can vary.
    • For Macintosh, in the Print window, click Preview, then select Xerox Features.

      NOTE: The method to access the print driver settings may vary depending on the operating system and application being used.
  3. For Job Type, select Saved Job.
  4. Type a job name or select a name from the list, then click OK.
  5. Select any other required printing options.
  6. Send the job to the printer:
    • For Windows, click OK, then click Print.
    • For Macintosh, click Print.

Now that the print job is saved on the printer or multifunction device the job is available to all users that have access to the printer. This is important to note so that you don’t use it for documents that have confidential content that other printer users should not access. The jobs are stored in folders on the hard drive of the machine. The number of jobs that can be stored depends on the types of documents and the size of the file.

The folders the jobs are stored in also have file limits. These vary by machine and the size of the hard drive. Once a folder is full you must use a different folder to store the file, assuming there is still room on the hard drive.

Saved jobs for reprint will stay on the hard drive of the machine until one of the following occurs:

  • A user manually deletes a job.
  • The time period for retaining the job has ended
  • The Image Overwrite feature is run.
  • The hard drive is reformatted.

Many Xerox printers and multifunction devices have the Saved Jobs feature. Please check your user manual or go the support page for your machine to see if you have it. On the support page search on ‘saved job’ or ‘reprint saved job’ to find instructions for enabling and using the feature. Try it! It just may help you with your work processes.

Skewed and Crooked Images? Try These Tips

Skewed and crooked images can happen sometimes.  In order to fix the issue you need to determine what modes are affected.  Does it happen when you are copying, printing, scanning, or faxing (if available)? If the defect is only seen on copies that is a different issue than if you see the issue while printing.

Skewed or Crooked Image on Copies, Scans, or Sent Faxes

If the skewed or crooked output happens when you scan, copy or send a fax then concentrate your troubleshooting on the automatic document feeder.

  • Use an original in good condition. Clean off any dirt or debris that may be on the original document and, if possible, create a new original to be scanned.
  • Clean the glass and the feed rollers.
  • Make sure that there is no obstruction in the paper path.
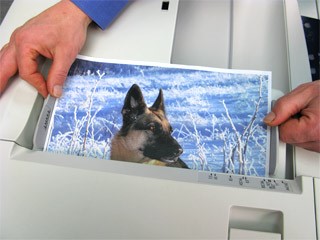
  • Slide the document guides toward the stack of documents until the guides lightly touch the side edges of the documents.

NOTE: If the document guide is set too tightly, the documents may not feed properly or may get damaged. If the guides are set too loosely, the documents may skew as they feed or could cause a document jam.

Skewed or Crooked Image on Copies and Prints
  • Check to see if there is any paper or debris inside the printer.
  • Use paper within specifications for the printer. Refer to the paper and paper tray specifications for your printer.
  • Make sure the paper tray settings are properly configured for the paper size and type loaded in each tray.
  • Verify that the paper tray guides are against the edges of the paper loaded in the paper tray. The paper trays accommodate standard paper sizes. If you are using non-standard paper sizes, load the paper in the bypass tray.
  • Ensure the paper moisture content level is not too high or too low
  • Make sure the paper is not loaded above the maximum fill line in the paper tray
  • Try fanning and flipping the paper over in the tray, and/or a new ream of paper.

On some printers adjustments can be made when the position of the output image is On some printers, adjustments can be made when the position of the output image is crooked or skewed. This may be a result of paper expansion or contraction, cutting inaccuracy, or paper storage conditions. If available on your printer use alignment adjustment setting features to compensate for misalignment and skew. To see if your printer has the alignment adjustment setting feature, refer to the online support for your model or printer and search on alignment adjustment.

If the image is still crooked or skewed after trying these suggestions, you can post your specific concern on the Customer Support Forum or contact your local support centre for additional assistance.

Getting to Know Your Xerox Security Page

Xerox tries to make it easy to find all the information and resources you need to help you meet your security goals. We know that the security of your information is important to you and it is important to Xerox. We will provide you with the tools we can to safeguard the information on your devices. It is up to you and / or your IT staff to utilize these tools. Please subscribe to or check our Security webpage periodically to  stay updated on new information that is posted for your benefit. Information posted can be product specific or generic depending upon the topic.

Simply navigate over to the Security webpage and select your Product Platform (e.g., AltaLink) and model (e.g., C8030) of your machine to see any updates or patches available for your product.  There is also a news and events section where you can get information that is more detailed on the security vulnerabilities

Another feature of this page is the See all Security Bulletins link that will list in chronological order all the bulletins that have been released.  Remember knowledge is power when it comes to security. Another resource to review is the Xerox Product Security Frequently Asked Questions page. Please review all these resources to stay up to date with security features, updates, upgrades and tips. This is the proverbial “you can lead a horse to water, but you can’t make him drink”. Please take the “drink”. The information you will safeguard is your own.

Online Support also has information about security. Search on “security” to find out what you can or need to do to protect your printers and multifunction devices. Please look over the information provided. If you need further information, we have a Product Information Security Request site where you can register an inquiry. In this digital data age security is everyone’s responsibility. Please do your part to secure your Xerox devices.

Scan Software and Destinations for Xerox Multifunction Devices

The scanning feature may be called many things from scan to file, scan to PC, scan to home, scan to e-mail or network scanning to name a few.  All these names describe the ability to scan a document on paper to an electronic format so they can be organized, stored, archived, printed and even searched.  Scanning can convert those papers taking up space in your office to a digital format that will no longer clutter your workspace. 

Scan Destinations

The scanning feature can be broken down by the scan destination. 

  • Scan to Email – scanning to an email address uses Simple Mail Transfer Protocol (SMTP) to send scanned files directly from the printer to an email address
  • Scan to Home – allows users to scan to their home folder, as defined in your Lightweight Directory Access Protocol (LDAP) directory.  LDAP helps send messages between servers and client applications, or to a shared folder on the network
  • Scan to PC – scan to a specific PC on the network.  During the scan process you will choose the PC to scan to from a list of available PCs.    
  • Scan to Network – Uses templates to route the scan to a designated location on a server or PC, usually called a file repository. A template is a file that stores the preferences for the scanning and routing to a shared folder on an SMB server, or an FTP server.
  • Scan to File – scan a document and automatically save it into a specified location on your computer
  • Scan to USB – scan a document and store it to a USB memory device

Scan Software

  • Xerox Scan Drivers – drivers that allow you to use the scan feature on your multifunction device.  These drivers are usually product or product family specific.  The scan drivers are available on the product’s drivers and download pages.
  • TWAIN Driver – TWAIN is an interface standard that allows imaging hardware devices (such as scanners and multifunction devices) to communicate with image processing software. The Xerox Document Scan TWAIN driver allows TWAIN-compliant applications running on a Microsoft Windows XP or higher OS to access the Document Scanner on a network connected Xerox multifunction device. The TWAIN Scan Driver is configured by the Microsoft Windows Scanner and Camera wizard. The operating system determines the scan location on the computer; this cannot be modified by the user.
  • Windows Image Acquisition (WIA) driver – WIA is one of the standard components provided by Microsoft Windows XP Operating Systems (OS) SP1 and later, or Microsoft Windows Server 2003 OS and later and works with digital cameras and scanners. Unlike the TWAIN driver, the WIA driver allows you to scan and easily manipulate images without using additional software. When using the WIA driver the Xerox multifunction machine must be connected to the computer using a USB cable.

Where to Find More Information

Scanning is a great feature that can speed up your work processes, lower costs and help you organize your documents. You can read scanning tips at the Paper to Digital: Scanning Documents webpage.

As always, for more information consult the documentation and online support knowledgebase at the Xerox.com support page for your machine model. You can search for specific articles on the type of scan you would like to do or simply search on the word scan to see the options for your specific product.  The scan drivers are available on the product’s drivers and download pages.

Take advantage of our online resources to learn how to benefit from the scanning capabilities of your Xerox product.

Technical Content Videos for Your Xerox Devices

Product videos are available for many of the Xerox multifunction printers. Videos for the VersaLink and other Multifunction devices were recently added to the Xerox Support YouTube Channel. The videos are available 24/7 at no additional cost to you. These videos walk you through many of the features of the machine and can be viewed through a playlist or a video at a time. The flexibility is great. You can watch just one video to answer a pressing question on how to do something like using scan to e-mail, for example.

These videos are great to familiarize yourself with the most popular features and functions of the printer(s) and are wonderful for new users and casual users that may not necessarily need to know everything about the Xerox printer. If you have a user that only uses one feature, they can just watch the video for the feature they need.

Below is a partial list of the machines that have technical video content. Click on the machine name to be redirected to the YouTube playlist.

Xerox® C310 Printer

Xerox® C315 Multifunction

Xerox® C230 Printer

Xerox® C235 Multifunction

Xerox® B225 Multifunction

Xerox® B230 Printer

Xerox® B235 Multifunction

Xerox® B310 Printer

Xerox® B315 Multifunction

Xerox® AltaLink® C8100 Series Color Multifunction Printers

Xerox® AltaLink® B8100 Series Multifunction Printers

Xerox® VersaLink® C7000-7020-25-30

Xerox® VersaLink® B7025-30-35 MFP

This is just a few, please visit our Xerox Support YouTube Channel for a full list of product videos. I hope you take a look. The videos are helpful and can get you to answers quickly. This is just one more option for finding the support for your Xerox printer when you need it.

Scan to Email, Gmail, and the Google App Password

Are you using a Gmail account with scan to email on your Xerox printer or multifunction printer?  If so, changes that were made on May 30, 2022, by Google, will impact your ability to send emails from your printer. These changes made by Google will affect most multifunction devices that email regardless of printer manufacturer. This will only affect you if you use Gmail accounts in the printer. 

The Scan to Email Issue

Google is requiring Gmail account users when scanning to email to use a Google App Password from now on.  This is a requirement from Google and not from Xerox. Without the Google App Password, the printer will stop sending emails. This may lead you to believe there is an issue with the printer, but the issue is this change in Google security and permissions.  After May 30, 2022, Google will no longer support the use of third-party apps or devices like your multifunction printer to sign into your Google Account using only your username and password.  The Google App Password will be required.

The Suggested Fix

An app password is a 16-digit passcode that gives a non-Google app or device permission to access your Google Account. The required password is obtained by turning on 2-Step Verification in the customer’s Gmail accounts.   The instructions for this process are outlined in the Gmail Help article Sign in using app passwords.  Once the App Password has been created, it can be used for the printer to authenticate, and used for Scan to Email. According to Gmail Help, most of the time the app password will only have to be entered once per app or device, so no need to memorize it. The process to update the authentication can vary depending on the Xerox printer model.  if there are any questions about where the password is input in the printer, check in the online support for your printer or contact your local support centre

 This is a change that can be quickly addressed to get you back to scanning to Gmail accounts once again!

Message – Important Indicator Do Not Ignore

Have you ever had a message come up on your printer and you do what it says but the message just won’t go away? It happens sometimes and though it seems like a mystery that will remain unsolved (such as why do we press harder on remote-control buttons when we know the battery is dead?), let me solve some of that mystery for you.

When these types of messages happen, what should you do? First if the message is telling you to do something such as empty the waste tray, try doing it again. If it is a message about a tray, cover or door make sure it is closed all the way. Some messages have you do things that have to do with sensors on the printer and sometimes those sensors need a few seconds to reset. For instance, in the case of the Empty Waste Tray message the waste tray must be out of the machine for at least 5 seconds before it is returned to the machine so that the message will clear. Sometimes we just do things too quickly so slow down, count 1 hippopotamus, 2 hippopotamus, etc. and then see if it clears.

You can look for other resolutions by going to the support page for your machine and typing in the message exactly as it appears on the display or report. Follow the directions in the solution and that should help. Depending on the message you may be asked to turn off the machine. Again, slow and patient, turn the machine off and wait 30 seconds to as much as 2 minutes, depending on the machine. You can count 1 hippopotamus, 2 hippopotamus, etc. and no cheating by just saying 1 hippo, 2 hippo, etc. That will not work. For the longer wait times try singing your favorite song, play on your phone, or close your eyes and take a mini vacation in your mind, then power on the machine.

You can also go to the Customer Forum and search for the message or post a question about it there and someone might have a great answer for you. If the pesky message still will not go away, then you will need to call for support. When you call support make sure you have your serial number and the exact message. The exact message is important, telling the support person “it says something about the paper tray” will not help us help you. We need to know the exact message to give you the best support possible.

I hope you never get one of those messages that will not go away but if you do, you at least know where to start and what to do. That’s one mystery we know that can be solved!

Xerox® Clean Hands Reminder Screen Saver

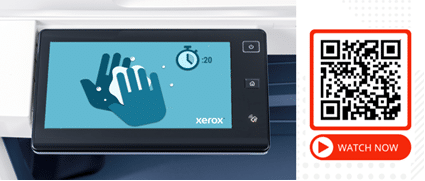
As more and more people return to work in the office it is increasingly important to maintain good hygiene with frequent hand washing. Add a hand washing reminder to your workplace with the Clean Hands Reminder App for your VersaLink®, AltaLink®, PrimeLink® and other ConnectKey printers. The app displays when the device is inactive. When the user touches any portion of the screen or a button, the app exits to the home screen.

The Clean Hands Reminder app is a friendly, non-intrusive, screen-saver type reminder to maintain proper hygiene. It can be located right on the screen of your printer.  It is a simple silent reminder for users to protect themselves and co-workers. The app provides another tool for maintaining a clean and safe work environment.

The app can be added to any new or existing device in less than 2 minutes. The free download works for with any ConnectKey enabled devices with EIP v3.5 or higher. Please note the app does not include the i-series devices. The app is available globally with the titles and descriptions in English, Español, Français, Deutsch, Italiano, Português, Nederlands, and Türkçe.

To install this free app on your compatible devices, download the Clean Hands Reminder app. The app is available from the Xerox App Gallery’s General section.  For your convenience there is a 2 minute How To video to walk you through installing the app.  The How To video is on YouTube on the Xerox Support channel. Or simply scan the QR code to watch the video.

Cleanliness is always important whether for combatting the spread of Covid or any other communicable virus.  In addition to the Clean Hands Reminder app Xerox has a site Xerox Print Devices Cleaning Guidance. The site provides ways to keep the external surfaces of your printers clean to help maintain a healthy workplace. 

Remember to clean surfaces, wash your hands, and maintain your distance to help make your workplace a safer place for you and your co-workers.

Beeps and Sounds

Does your Xerox multifunction device or printer beep and make sounds? Does the sound bother you or your coworkers? Those tones all have a meaning and are there to help you know when a task is completed or the machine requires attention, for example.  These beeps and sounds can be adjusted on many of the printers. The audio tones can be turned off or the volume can be increased or decreased. The settings can be adjusted right at the printer or through the embedded web server.

Changing Tones

To change the tone settings on most of the machines you will need to log in as the System Administrator to make the changes. You can search the Online Support page for your machine for how to log in as the System Administrator. Simply search on “login” or “System Administrator” to find the instructions and the default username and password for your machine.

Types of Tones

Some of the printers and multifunction devices have settings for individual types of beeps and tones. Here is a list of some that can be adjusted.  Other options may be available on different models of printers, and some may not be available on your printer depending on the options installed.  

  • Touch: A sound plays when a user interacts with the control panel touch screen.
  • Job Completion: A sound plays when a print job, copy job, or receive-fax job completes.
  • Log In: A sound plays when a user swipes an authentication card.
  • Error/Fault: A sound plays when the device issues an alert or when the device requires user attention.
  • Power: A sound plays when the device is powering down.
  • Mobile Device Connected: A sound plays when a connection to a mobile device is detected.
  • Fax Processing Tones: A sound plays when a fax is sending or receiving.
  • Fax Ring Tones: The fax line ring tones are audible when the device receives an incoming fax call.

Choice of Settings

The sound settings include off which means no tone will be emitted. Or you can adjust the volume to a level that is acceptable in your environment. The beeps and sounds can be helpful to let you know when jobs are completed or when there is a problem at the machine so consider your choices carefully depending on the environment in which the machine operates.

The new audio settings will remain in effect until you change them or until your machine is reset, for instance after a service call you may notice that the tones are heard again depending on what the technician needed to do to service your machine.

If you do not find a case and solution in the online support for changing the audio tones on your machine, then you may need to have your technician adjust it or disable the tones next time they’re there to service your printer. Don’t let those tones bother you or others. They can be adjusted to make your environment quieter.

Mother’s Day, Graduation and So Much More

Mother’s Day, graduation and many other important occasions happen during this time of the year.  Can you guess the connection between the events? We are talking about greeting cards.  Mother’s Day is this weekend.  If you are still looking for a card for your mom how about printing your own?  Also, graduations are coming up as well as weddings and Father’s Day.  You can print out cards for all these occasions and more. 

In the Small Business Resource Center, we have greetings and holiday cards for most occasions. You can personalize the cards and print them out. Print them on your Xerox printer or multifunction device. 

Printing on cardstock will have your greeting card looking and feeling like it came right from the store. Please make sure you use a cardstock that is on the recommended media list for your machine.  You can find that list in the online support for your machine. Simply search on Paper and the paper specifications will display.  There are a few heavier weights of paper, such as Lightweight Cardstock (60 lb./163 gsm), Cardstock (80 lb./216 gsm), and Heavy Cardstock (100 lb./270 gsm), for use with different applications, such as printing greeting cards.

Please note that when loading the paper and configuring the machine, heavier paper weights require the correct setting to ensure proper function of the printer and the best image for your card. Toner is applied differently to different paper weights. Differences in paper weights require the toner be deposited using different charges to the paper. Incorrect driver and/or tray settings can cause image quality issues such as or mottled prints, deletions, poor print resolution or light or dark output. Remember to set the correct paper specifications when you load the cardstock in your printer. 

Look at the templates for all kinds of greetings, holiday, and special occasion cards that you can use throughout the year.  Make sure when you print to heavier stock to use the correct settings in the driver for the paper that you have installed and programmed at the printer to assure great outputs.

Happy Mother’s Day to all the mothers, grandmothers, and great-grandmothers.  Enjoy your special day and time with family.  For all you children, whether young or grown-up, happy printing!!