Banner Page: Why or Why Not?

What is a Banner Page?

The Banner page is the first page of a print job used as a separator of print jobs and used to identify the originator of the print job request. There are good reasons for printing banner pages but a case can also be made for disabling them.

In a work environment where many people print to the same printer, banner pages can be helpful in differentiating between print jobs and also letting others know the owner of the job to either expedite delivery of the job or allow it to be left for that person to pick up. Banner pages can include the date, time, name of the person printing the document, the IP address of the computer from which the job was printed and in some cases the name of the document.

Now if you work in an environment where there are only a couple of people using the same printer or maybe it is a dedicated printer then you may not need to use the banner page. Turning off the banner page will save paper.

How to Enable and Disable Banner Page

The banner page is turned on or off at the machine or in the embedded server / CentreWare Internet Services and in the driver. You can learn how to enable or disable the banner page by visiting the support page for your machine and entering the search terms banner page or separator page. Below is a sample screenshot of the driver preferences. This graphic from a VersaLink B7035 shows where you can enable or disable the banner page in the driver. On the VersaLink drivers, the banner page is accessed through the Earth Smart options on the driver. Of course, your driver may vary depending on the model of the machine and the driver used.

I have also included a video of how to enable and disable the Banner sheet on the Xerox B series. As always the screens may be different on your machine. Please check for a video on banner pages on your support page on the video tab.

So you decide, are banner pages good or bad for your environment?

Introducing the New Xerox® PrimeLink® B9100 Series

The Xerox® PrimeLink® B9100 Series is a new family of monochrome multifunction printers.  The PrimeLink B9100 Series is a great investment for the production or office environment.  The PrimeLink B9100 series is versatile and also has many options, from faxing to multiple finishers.  

Did you know that approximately 63% of the documents printed worldwide are printed in black and white?  I know I was surprised too.  The PrimeLink B9100 is an example of how Xerox continues to innovate and invest in our core technologies.  Black and white printing is not going anywhere so it is important to continue to invest in the technology and grow the possibilities and features in monochrome printing and copying.   

Let’s look at some of the features and options available on the Prime Link B9100 Series of multifunction printers.

Features:
  • Up to 136 prints paper minute (ppm) depending on the model
  • Copy, Print, Scan and Email standard
  • Scan speed up to 270 images per minute (ipm)
  • Double sided scanning in black and white or color. 
  • Multiple media types and media sizes
  • First time copy out 3.5 seconds or less.
  • Secure Print,
  • Image Overwrite,
  • Hard Disk Data Encryption,
  • Automatic Meter Reads
  • Workflow Apps from the App Gallery
Options:
  • Multiple finishers including Booklet Finisher, C/Z folder, Booklet Maker and many more
  • Optional Banner Feed Guide and Banner Output Guide for Extra-Long-Sheet (XLS) printing up to 26 in./660 mm
  • Inline paper cooling and decurler unit ensuring flat sheets for reliability and speed.
  • Digital Front End options

Where can you find more information you ask?  Well the usual suspects, the product page, the support site that includes the drivers and downloads, documentation and the how tos and troubleshooting cases. Another resource for information is the YouTube with a playlist of over 20 instructional videos.  There is also a brochure.  If you have additional questions contact Xerox via phone or email, phone number and email address are on the product page.    

Check out the PrimeLink B9100 series and see how it can elevate your printing, scanning and copying processes. 

Configuring Made Easy With Embedded Web Server

The Embedded Web Server (EWS) is the Web User Interface (UI) for the AltaLink and VersaLink devices. Previous devices use the CentreWare Internet Services (CWIS), which we discussed recently in the blog article CentreWare Internet Services – Quick Overview.  You have probably seen and used CWIS many times.

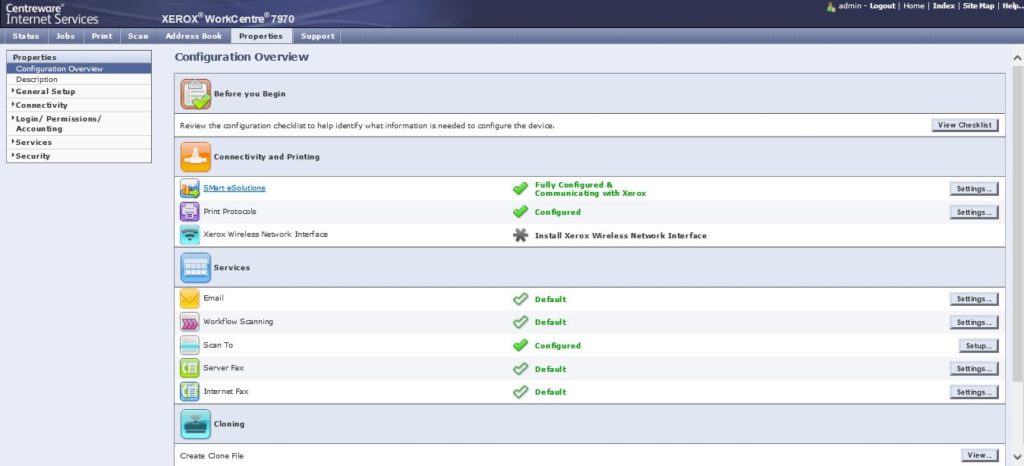
This is a screenshot of the CWIS:

The Embedded Web Server (EWS) brings you the same information you are used to from the WorkCentre and Phaser families. You can monitor your machine for error conditions, supply and paper levels all viewable on the interface.

The Embedded Web Server requires:

  • A TCP/IP connection between the printer and the network in Windows, Macintosh, UNIX, or Linux environments.
  • TCP/IP and HTTP enabled in the printer.
  • A network-connected computer with a Web browser that supports JavaScript.

The EWS is still the place to configure your machine as well. The administrator can use the EWS to configure all the available applications available on the machine. From security features to fax options they can all be programmed from the EWS from any pc that is connected to the same network as the printer. Please remember that the machine must be on the network to use the EWS. The EWS is not available on a USB connected machine.

You can learn more about the Embedded Web Server on the support pages for your VersaLink or AltaLink machine. To see all the cases and solutions for the EWS enter “web server” without the parentheses in the “Search For Keyword or Phrase” box provided on the support tab for your machine.

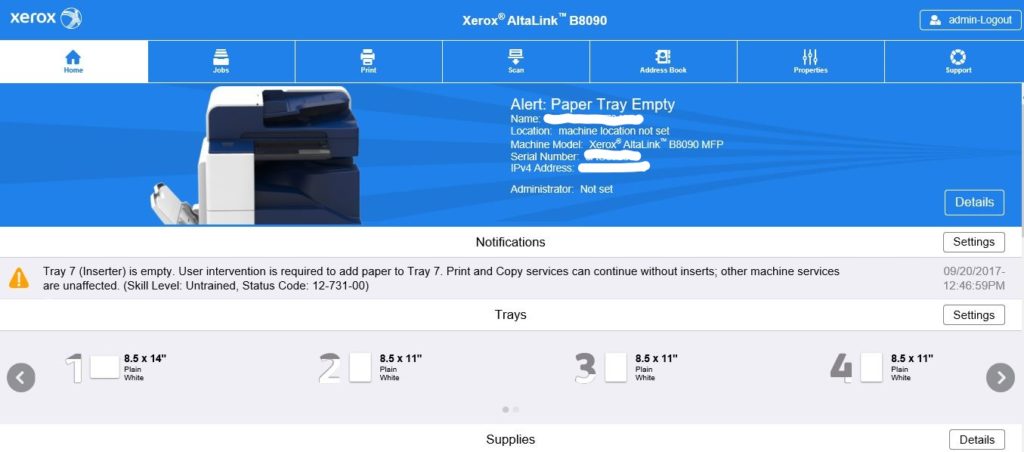
This is the screenshot of the new EWS for AltaLink devices:

As you can see the tabs are similar to those of the CWIS shown above.  Properties being the tab where most of your configuration activities will take place.  Notifications are front and center so you will know when something needs attention.  Looks like I need to add paper to tray 7.

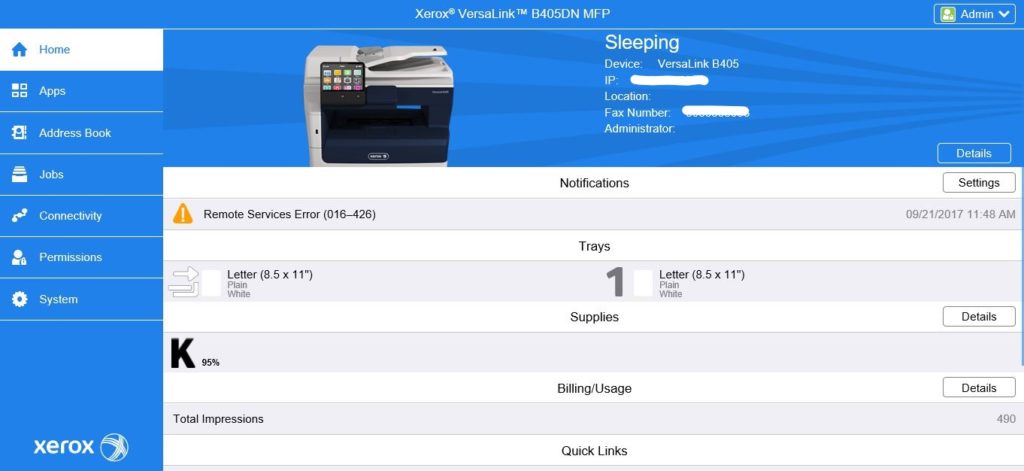
This is a screenshot for the VersaLink EWS:

Shhh!  As you can see my VersaLink is sleeping.  On the EWS for VersaLink the tabs have been moved to the left hand side of the screen and the names have changed.  Most of the configuration options will be displayed under the Apps tab.  You will also find important options under connectivity and system.

Explore the tabs on your own VersaLink EWS and review the available information on the support pages for your device. As stated before to see all the cases and solutions for the EWS enter “web server” without the parentheses in the “Search For Keyword or Phrase” box provided on the support tab for your machine.

New Xerox App Gives 24/7 Technical Support

New Xerox mobile app supports you anytime, anywhere

Introducing Xerox® Support Engage – a brand new app for Android and Apple phones and tablets which can solve your technical problems whenever you have the need, wherever you are.  Support Engage is for any Xerox device covered by any Xerox service agreement.

The Xerox Support Engage app is available at no cost from the iOS App Store and Google Play. Download it today to experience its power and reach.  Not only does it integrate with all of Xerox’s other support services to give you maximum choice, but it’s fast, too.  Tests have shown the app resolves issues in almost half the usual time.

Instant, expert support

To use the app, you simply interact with a multilingual, intelligent Digital Agent and select one of eight problem categories and then follow clear, step-by-step suggestions – drawn from Xerox’s extensive knowledge base – to resolve the issue.

Effortless escalation

If the suggested remedies don’t fix the problem, or if you prefer human contact, it’s easy to directly connect to one of Xerox’s Digital Support Experts.

This service, which is available during normal working hours, lets you engage with the Support Experts via text chat, audio or video.  To save time and avoid repetition, the Expert will have automatic access to a summary of the solutions that you’ve already tried.

Note: Xerox® Support Engage is currently available for download in the United States, Canada and most western European countries.

Learn more

If you want to know more about Xerox Global Digital Support, view our Value Proposition video.

If you want to see Xerox Support Engage in action, view our step-by-step demo video and download it now!

If you have any doubts, check our Frequently Asked Questions.

Consumable Yields – What You Should Know

Why they are important?

The International Organization for Standardization (ISO) announced yield testing and reporting standards for Monochrome Xerographic Engines under ISO/IEC 19752 in June 2004.  Standards for Color Xerographic Engines were also announced under ISO/IEC 19798 and ISO/IEC 24711 in December of 2006. These standards are important to ensure that toner or ink yield reporting by different manufacturers will adhere to the same testing processes, making yields comparable across different products and manufacturers.  This helps you evaluate consumable use and cost for printers or multifunction printers that you may be considering. 

How are yields calculated?

A minimum of three printers or MFPs are tested, using a minimum of three toner cartridges per device. Toner cartridges are purchased in the open market from multiple sources and, for newly developed printers or MFPs, cartridges should be sourced from different production lots. Testing nine samples of each toner cartridge produces lowest predicted yield estimates with 90% statistical significance.

A single page is used for testing. Area coverage on the page is just below 5%. Pages are printed in a semi-continuous print mode, stopping for paper reload only.

Printers or MFPs are set up according to manufacturer instructions using default drivers and settings. New printers must run through one complete toner cartridge before starting the test.

Testing must be done in an environment where temperature and humidity can be maintained within acceptable parameters set by the manufacturer of the printer.  Most printers require a Temperature Range of 23ºC ± 2ºC (73ºF ± 4ºF) and a Humidity Range: 50% ± 10% RH

The ISO/IEC yield is a comparative statistic and not predictive. The number of pages that you will get for your own applications will depend on many factors, with page coverage having the highest impact on yield. Research has shown that the industry average black-and-white page coverage is between 4% and 5%. There is a relationship between page coverage and toner yield—the lower the page coverage, the more pages the toner will yield. Conversely, higher coverage pages result in lower toner yields.

Where can you find out more?

We provide testing data and results on the ISO Testing reports page.  The Printer and Multifunction Consumable Yields document offers the information about the process of testing yields and what they mean.  The document also includes information on what affects the yield totals.

We hope you find this information helpful in choosing the best printer or MFP for your budget and business needs.

CentreWare Internet Services – Quick Overview

CentreWare Internet Services (CWIS) is a very useful tool available on networked printers. CWIS is the embedded HTTP server application that resides in the printer. Internet Services allows Administrators and Users to modify network and system settings on the printer from the convenience of their computers or tablets. The CWIS allows you to program and check the status of the machine from the comfort of your office or cubicle. I love this feature because I can do so many things without having to touch the printer. This can save me time and the CWIS interface is so easy to use. I can check the status of the printer, the paper trays and the consumables. I can check settings and actually change settings from the CWIS screens. Please be aware that some changes may require the Administrators password. I can even upgrade the machines firmware from the CWIS.

Pretty much anything you can do from the User interface of the machine you can do from the CWIS. All you need is the Internet Protocol (IP) address of the machine and you can access the CWIS. The IP address will be a number split into octets. Example: 123.456.789.012 Why are these 3 digit sets separated by decimal points called octets and not triads? Good question, the answer is each set of 3 numbers is 8 bits of information so they are called octets, okay granted that is a little confusing but all you really need to know is the IP address and you are in the CWIS. Since an IP address is required to open the CWIS it is not available unless your machine is on the network.  CWIS is not available with a UBS connection. 

To access CWIS simply open up a web browser of your choice, Edge, FireFox, or any other browser and enter the IP address in the Address field and press Enter / Return. The IP address of your machine can be found on the Settings or Systems report. These easy steps will take you to the CentreWare Internet Services (CWIS) where you will see several tabs that will allow you to program many functions of your machine. Please take a look at this feature and head on over to the Support page for your machine and search on CWIS to see all the things that can be accomplished using this interface. Explore the possibilities!!!

Below is a graphic of the properties screen for CentreWare Internet Services (CWIS). Disclaimer: not all machines will have the CWIS, your window may look different depending on the model of your machine and browser being used, 4 out 5 dentists agree, images may be larger than they appear, and results may vary. (Just making sure you’re paying attention!!)

Paper Facts: Part 7 Paper Summary

Over the last few weeks, we have been exploring the world of paper and how it affects your image quality, printer reliability and every aspect of producing images.  We also looked at how to properly store paper and choose paper for your printer and document type.  The original article came from an article in the online knowledgebase.  When we began this series I did not know the original creator of the article but I have since found out that Nick Lowe created this valuable article.  Thank you Nick for this great information. 

Let’s take a quick look at the articles from the Paper Facts series:

 All six articles combined give you the full story behind the importance of paper to the end product of your printer.  Remember that the paper may be the issue in image quality issues, misfeeds, and paper jams.  If you are having an issue in one of these areas try different type paper or a different ream of the same type paper.   

In the big picture of printing, paper is a given, you know paper will be involved but rarely do we look to the paper when there is an issue.  It goes back to the saying from Professor Theodore Woodward “When you hear hoofbeats, think of horses not zebras” it means that when looking for an explanation or solution, you should always consider obvious possibilities, like the paper, before thinking about more complex or unlikely options.

Try the simple solutions first, power off the printer and power it back on, change the paper and check that the paper trays are loaded and programmed properly.  Those simple things will fix many issues with the printer and print quality.  Horses not zebras!

Paper Facts: Part 6 Paper Storage

This article will present information about the importance of the storage of the paper or media you are using in your printer.

Paper Storage Explained:

Paper is highly sensitive to moisture and the humidity levels within which it is stored. When paper is manufactured, most manufacturers produce paper to strict quality standards including a well regulated level of humidity of between 25-50%. The paper is then carefully sealed into packaging that contains a special lining for maintaining the humidity level of the paper for as long as it is properly stored. It is then loaded into cases and onto wooden pallets with an even surface for shipping to the customer. Paper shipped in this condition is perfect for Xerographic applications, but the freshness of the paper is dependent upon its storage conditions when stored, waiting to be used.

As paper is made of wood fibers, it exhibits similar behavior as other paper products such as paper towel. As a result, paper that is improperly handled or stored, can be subject to excess moisture from the atmosphere, which can cause the paper to increase in size, warp, curl or stick together.

Paper Storage Issues:
Paper with moisture issues can lead to the following issues:
  • Damp paper can warp in tray – Paper that has absorbed too much moisture from the atmosphere can begin to become wavy or warp, starting around the edges of the sheet. Warped paper can jam in the paper tray when attempting to feed from the tray, causing a misfeed, and cause wrinkles during the printing process.
  • Dry paper can also warp in tray – Paper that has lost too much moisture can contract around the edges of the sheet causing “tight edges”, which can lead to misfeeds, jams, registration issues as well as wrinkles.
  • Damp paper can wrinkle in the paper path – Slightly deformed damp paper can lead to paper wrinkling in the paper path. This can result in wrinkled output, paper jams and lines in prints.
  • Damp paper can affect Toner bonding to paper – Damp paper can lead to poor Toner application to paper and poor fusing, such as light/faded output, smudging or Toner rubbing off the page.
  • Damp paper may Curl – Damp paper may curl more than normal paper would, resulting in curly paper output, or increased instances of misfeeds and paper jams.
  • Damp paper may adhere to other sheets – Damp paper may stick to neighboring sheets of paper, becoming difficult to separate and cause misfeeds and jams when multiple sheets of paper are pulled into the printer at once.
Paper Storage Considerations:
  • Keep paper in its original packaging until ready for use – Paper is packaged in a wrapper lined with polyethylene plastic that is resistant to moisture and maintains the moisture level of the paper inside the package. Also keep unopened packages of paper stored inside its original cardboard carton whenever possible.
  • Carefully handle paper packaging – When transporting or handling cartons or individual reams of paper, be careful to avoid, hitting, denting or dropping packaging as it may deform corners or edges of the paper that are immediately visible. Paper damaged in this manner may increase instances of tray misfeeds and jams.
  • Do not store paper on or near the floor – Keep the paper away from environments that experience extreme temperature and humidity shifts and do not store paper flat on the floor as this increases chances of moisture being absorbed into the paper.
  • Store paper in a storage cabinet or flat shelf – For paper storage, always keep unused paper in a dry, flat storage cabinet where it can be protected from physical damage and the elements. Always stack the paper evenly on top of the other to avoid curling, bending or damage to the corners of the paper.
  • The storage location should be climate controlled – The storage location should also be kept within 68°F/20°C to 76°F/24.4°C and within 35-55% humidity levels for best results. In damp or humid environments, paper, even the paper loaded into the paper trays, can absorb moisture from the air and become too damp to use.
  • Paper must be conditioned before use – If the paper cannot be stored in a climate controlled environment or has not been stored this way, the paper must be given a conditioning period before use in accordance to the temperature and humidity levels at which it was stored. For example, a carton of paper stored in a 57.2°F/14°C storage room, brought into a 72.5°F/22.5°C production room must be conditioned for 8 hours before use. The conditioning the time will vary depending upon the temperature difference of the storage area and the number of cartons being used.
  • Reseal packages of paper after opening – When opening a new ream of paper and using only a portion of the paper the package contains, reseal the open ream using tape to maintain paper freshness. The packaging contains a special lining that absorbs moisture to help keep remaining paper dry.
  • Use only the amount of paper needed in the tray – When loading paper into the printer, load only the amount of paper that the job requires or that will be used in the short term. Paper inserted into the paper trays will absorb moisture from the atmosphere over time, which can lead to the many damp paper issues listed above.
  • Store paper in its original package if not being used for an extended period – As paper will absorb moisture from the atmosphere around the printer, if the printer is loaded with too much paper than will be used in the short term, remove the paper from the trays of the printer and back into the original packaging if available.

Join us next time for the final article in our series Paper Facts.

Paper Facts: Part 5 Other Considerations

Performance & Quality:

There are multiple aspects of getting the best performance from a Xerox Device, such as:

  • Print speed
  • Print quality

Print speeds of a Xerox printer are measured in Pages Per Minute (ppm) using an industry standard print test page and printed single-sided on 16-28 lb/60-105 gsm 8.5×11″ LEF (Long Edge Feed) paper. Heavier and/or larger paper stocks, paper orientation, duplex (double-sided) printing as well as increased document complexity, will increase printing time and slow print speeds down.

Also, print resolution of a Xerox printer is measured using Dots Per Inch (dpi), with modern printers ranging between 1200×600 dpi up to 2400×1200 dpi. However, as the dots are small, the surface quality of the selected media is an important factor in the image quality output of the machine. Plain 20 lb/75 gsm paper, or uncoated cardstocks with rougher surfaces such as cover material, may have a surface that is unable to resolve the printers output resolution as well as smoother paper stocks can.

Print Speed Considerations:
  • Heavier paper is more resistant to bending around the paper path – As heavier media is thicker, it offers more resistance when being fed through the paper path of the printer. To adjust for this, the printer adjusts friction and feeds the paper slower to allow the paper to properly pass through the paper path without jamming. Tray settings that have the paper weight set too heavy incorrectly will take longer to print, and may also increase the instance of skewed prints, paper jams and misfeeds. Tray settings that are set too light will increase the likelihood of misfeeds, jams and possible damage to the printer.
  • Print with the grain – Printing with the grain is less of an issue with normal bond paper weights (16-28 lb/60-105 gsm), but is still important and critical with paper weights of 120 gsm or more. When paper is pulled into the printer to be printed on, it is bent and curled around rollers inside the machine as part of the printing process. Paper bent perpendicular to the grain structure of the paper offers more resistance than paper bent parallel to the grain. As a result, printing against the grain of the paper can increase the occurrence of misfeeds and paper jams. For best results, load the grain edge of the paper parallel with the printing process.
  • Lighter paper weights use less heat to fuse – As heavier paper is thicker, it contains more mass, requiring a higher fuser temperature to properly bond the Toner to the media. Tray settings that are set incorrectly can result in poorly fused Toner, Toner rub off, as well as misfeeds and jams.
    • 8.5×11 paper with the grains running the 11″ side, load in Long Edge Feed Orientation.
    • 17×11 paper with the grains running the 11″ side, load in Short Edge Feed Orientation.
  • Load US Letter/A4 Paper in Long Edge Feed for Fastest Performance – On larger printers, as the paper path can accommodate feeding the long edge through the machine first, it can pass the paper through the print engine faster than if printing Short Edge first. For fastest performance when performance is important, print US Letter/A4 Paper sizes in Long Edge Feed orientation whenever possible.
  • Simplex Prints Faster than Duplex on heavier settings – Print speeds for Simplex (single sided) and Duplex (double sided) are generally rated as the same print speeds, with the exception that each side of a Duplexed sheet is counted as 1 sheet (ie: 50 pages per minute equals 25 sheets). However, as the paper in a duplexed print job needs to be bent around rollers and fed around the duplex path to print the second side, print speeds are reduced for heavier media. Incorrect tray settings can result in slower duplex print speeds, or increased occurrence of jams in the paper path.
 Print Quality Considerations:
  • Smoother paper for better Image Quality – A smoother surface on the paper means a flatter area for Toner particles to bond to when deposited on the paper. A flatter, smoother print surface means the printer can print cleaner, sharper text, cleaner solid areas and more accurate halftones. For best results when printing to Plain paper, use a 24 lb/90 gsm paper such as Xerox Bold Digital Printing Paper.
  • Rougher paper has poorer Image Quality – Paper with rougher surfaces offer an uneven surface for Toner to bond to, resulting in poorer output resolution, muddier text, mottled solid areas and poorer looking halftones. Also, Toner will not properly bond to extremely rough surfaces, such as textured paper, and may result in light or faded output, deletions, lines, poorly fused output and Toner rub off. Some issues with light output can be alleviated by using a higher density setting using the Lighter/Darken setting.
  • Best Image Quality with Coated Stocks Coated stocks use a special coating to fill in and smooth out the microscopic pits and valleys to create an even smoother surface, and comes in glossy or satin varieties and more. The coated surface offers the optimum flat surface for Toner particles to bond to in the pattern deposited, resulting in optimum condition solid areas, halftones and text. Coated paper is the optimum paper choice where image quality is paramount, such as with posters, banners and even flyers. For best results, use media from the Xerox Recommended Media list for the printer (such as Xerox Bold Coated Gloss or Coated Satin Digital Printing Paper).

Paper Facts: Part 4 Paper Quality

Welcome to Part 4 of our series on paper. Today we will be looking at paper quality a subject that is not often addressed but plays a major role in image quality.

Paper Quality Explained:

Paper is made from cellulose fibers. Most of these fibers are sourced from trees, though some fibers are sourced from cotton or recycled rags. Using fibers sourced from hardwood or softwood trees can also have different effects on the quality and purpose of paper produced. As a result, the blend of fibers used, the quality of the ingredients and consistency of the blend directly affect the quality of paper produced. A paper manufacturer with poor or inconsistent quality control may have poorer results when compared to papers found on the Xerox Recommended Media List for the printer.

Paper Quality Considerations:
  • Inconsistent or Incorrect Paper Weight – As the internals of the printer are electronically set depending upon the paper weight specified. Paper that is outside of the stated specifications can cause issues with friction applied to the paper as it passes through the printer. This can cause paper to skew, jam, or cause rapid wear to internal mechanics such as rollers.
  • Surface of the Paper is Rougher or Smoother than stated – Rougher paper can lead to poorer image transfer to the paper, such as reduced print resolution. Smoother paper may have image quality issues if the Toner is unable to cling or fuse properly to the medium, or may cling to statically charged components such as the drum, causing paper jams.
  • Stiffness of the Paper – If the Paper is too stiff or too flimsy, it may have issues circulating around the rollers or print engine (such as the drums or fuser) inside of the printer, leading to paper jams, especially at high speeds.
  • Electrostatic Properties of the Paper – Paper formulas that do not contain the right blend of fibers and chemicals may respond differently to electrostatic charges applied to the paper during the printing process. Paper that lacks the correct electrical properties may have issues with Toner clinging to the paper and cause print density issues such as light prints, deletions and other print quality defects.
  • Paper Dust – Poorly made paper may contain lots of finings or paper dust that can accumulate over time in the paper path, leading to clogged pathways and gummed up rollers, leading to tray misfeeds, skewed prints and paper jams.
  • Surface Quality is Uneven – Paper with poor density/thickness control can lead to poor image transfer to some areas of the paper, leading to image deletions.
  • Poor Paper Formula/Incorrect Paper for Application – Poorly made paper or the incorrect paper for the printer (such as Inkjet paper) can lead to reduced component life, such as the drum, transfer belt, bias transfer rollers or fuser.
  • Incorrectly Sized or Cut Media – Modern printing devices are fairly specific when it comes to paper size, poorly cut media that is too large, too small or cut unevenly within even a few millimeters can lead to paper jams, skewed prints or issues configuring the initial tray settings.
  • Moisture levels within Media not well controlled during Production – Poor quality control when manufacturing paper can result in paper containing too much or too little moisture, which may result in warped or curly paper, leading to tray misfeeds, jams, poor fusing or Toner rub off.

I bet you had not thought about the different ways the quality of the paper can impact not only the image created but the printer’s inner workings. Good quality paper can save you on repairs in the long run.

Join us next time for Part 5 of our series Other Considerations where the performance and quality will be addressed.