Xerox MySupport Portal Manages Your Fleet of Printers

Xerox MySupport Portal is an easy to use online portal for managing your entire fleet of printers and multifunction devices. The portal allows you to manage and customize your view of Support & Driver content, meter reads and history and supply information for your specific printers. Device statuses and connectivity statues can be monitored Tailor the display settings to products you want to see regardless of location.

The portal helps you manage your fleet more effectively by viewing work-loads and supply information so that work can more efficiently be distributed across your devices.  Tracking your supplies allows you to manage the supplies so that there is little or no loss of productivity due to running out of supplies.

The MySupport portal offers the opportunity for Xerox to communicate critical information about your devices. Support content can be accessed with just a click making it easier to support your users when questions or problems arise.   

MySupport Portal makes it easier to:

Stay up to Date.

  • Receive the latest security alerts
  • View most recent data for Remote Print Services
  • Subscribe to software updates, support bulletins, and product documentation

Monitor your usage patterns.

  • Analyze historic meter reads for all your Remote Print Services enabled Xerox devices on your network
  • View last reported ink or toner levels
  • Have a fleet view of your Xerox devices

Find Information Fast.

  • Access your product’s knowledge base with one click
  • Locate pertinent  IT information

Check out the MySupport Portal webpage for more information and registration information for the portal.  So what are you waiting for? Go check it out for yourself!

Tips, Tricks, Workarounds? Share Them on the Xerox Customer Support Forum

The Xerox Customer Support Forum wants you, more specifically your knowledge, tips, tricks and workarounds. Let’s face it you are in the trenches using Xerox printers and / or multifunction devices every day in scenarios our engineers may have never considered. You have a wealth of information that may just help someone else. The forum has questions and answers from people just like you – the people that use the machine on a daily basis. Simply register for the forum and post your question or answer someone’s question.

People from around the world participate in the forum community but please remember all content should be in English. You could have the answer someone else is looking for and save them time by answering their question. It is a win – win type of support. As you become more involved in the forum you can earn ever-increasing ranks on the board. You don’t have to register to look through the forum but we hope you will sign up and contribute. You can create a post if you have a question, tip, workaround or other information to share. 

There are how tos available on the forum site to help you get started and use the forum more effectively. When you post your issue please provide as much detail as you can about the issue including operating system, device, and application being used. Also include any error codes or messages you are seeing. These details will help people suggest answers or solutions to your issue. When posting an answer please provide as much detail as you can on how you fixed the issue, other users will appreciate your time and effort. Photos, videos and documents can be uploaded with your post.  Photos or screenshots of errors or settings are helpful in diagnosing an issue or explaining a solution.  You will find many helpful screenshots in some of the answers on the forum.

The Xerox Customer Support Forum has several helpful features. One of these is the search (pictured below). The search should help you to find information about your issue if it already exists on the forum. The community is fully searchable making it easy to find what you are looking for on the forum.

There is also a suggestions feature that will display as you enter the subject for your post. You will see displayed posts similar to the title that you are typing in to the subject field. If you do not want to see the suggestions, you can turn off the feature by selecting Turn Off Suggestions in the lower left corner of the drop down box that displays. This feature could find you an answer before you even start to post your message. How is that for efficient?!

The Xerox Customer Support Forum is another way we are trying to bring support for your products closer to you so that you can get the answers you need when you need them.

Fax Forward to Email – Quick and Easy

Have you ever wished that the fax you received would have just been emailed to you so you had it in an electronic format? Well, we have a feature for you. The Fax Forward to Email feature on your Xerox Printer or Multifunction machine can be used to automatically forward fax jobs to an e-mail address to save paper and speed retrieval and distribution. The printer can be configured to forward incoming and / or outgoing fax transmissions to an email account as an email attachment. You can then open the attachment and forward the message, or store the document or print it out at a later time. The email attachments of the fax can be set to PDF, TIFF and on some machines XPS. The Fax Forward to Email feature also adds a layer of security for your fax. The document is not just sitting there in the tray for the office nosy body to read while they are hanging out at the printer sending a fax or waiting for a print job.

On most of our machines with the fax capability the fax forward to email is available. Some machines have the fax forward feature for incoming and outgoing faxes so that you can even have an electronic version of faxes that you have sent. With the Fax Forward feature you can also request a copy to print out. So you can have the print out and the electronic version. Most opt for the fax to email version and bypass the print because it saves paper and if need be you can always go back and print out the fax if you want a paper copy. There is also no need to worry about lost faxes. If there is an error that prohibits the forwarding of the fax, the device can be configured to print the fax at the device when such an error occurs.

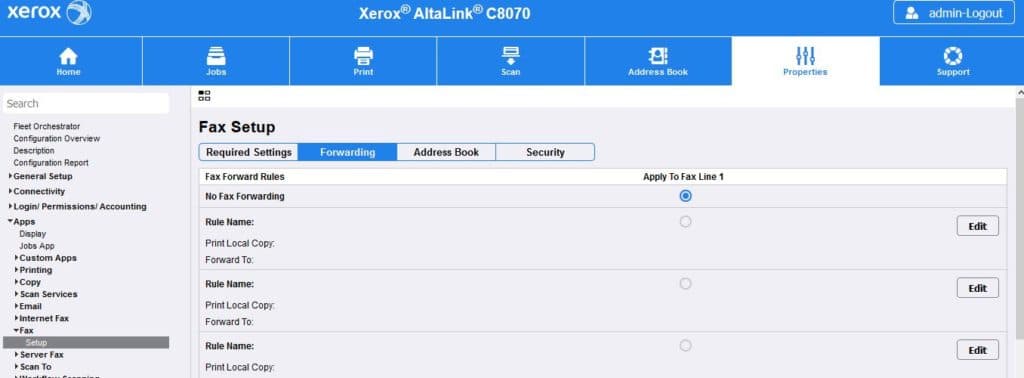
For Fax Forwarding on the AltaLink Family and many of the other families the Fax Forward setup is on the Embedded Web Server or CentreWare Internet Services (CWIS).  A Fax Forward Rule must be created and configured for the intended email address.  Once the rule is created you do not need to create it again it will be saved.  Please see the sample screen below. Here is the disclaimer: Your settings screen may look different, depending on the model and features of your machine.

Fax Forward on VersaLink family and other multifunction devices is setup at the printer’s control panel.  You must be logged in as the system administrator. You will find the fax forwarding on the VersaLink by selecting Device>Apps>Fax then selecting Fax Forwarding. 

To find full instructions on how to setup the Fax Forward to Email feature please refer to the manual for your machine or go to the support page for your product and search on “forward”. Not all machines will have the feature and you will need to have the Fax or Fax option installed and configured in order to use the feature. I guess what I am trying to say is some of you will have it and some will not just depends on what options and apps you have on your machine.

I know some of you are saying fax? Really? Do people still use fax? Well according to the facts people still use fax and for good reason*

  • Faxes can’t be hacked
  • Faxing offer easy confirmation the document was sent/received.
  • Fax is legally binding, email is not in most cases
  • Fax is still the easiest way to exchange legal documents (i.e. purchase orders, invoices, contracts, forms, etc.) that require signatures
  • 100 billion fax pages are transmitted around the globe on a yearly basis (that is 15 fax pages for every man, woman and child on the planet!!)
    *Source: fax.to and F@xBurner

One-Touch Apps on AltaLink and VersaLink Printers

One-Touch Apps help to simplify your work processes.  Do you have a job or task that you do the same way frequently?  You can speed up that process by turning it into a one-touch on the home screen of your printer. 

On the Xerox® VersaLink® you can create the one-touch app as a public one-touch for everyone to use or you can create a personal one-touch that will be on the home screen after you log in to your account on the printer.

Personal one-touch is not available on the Xerox® AltaLink® but the public one-touch app is available with software version 101.xxx.xxx.xxxxx or higher.  Determine the software version installed on your device.  Refer to How To Determine the Software (Firmware) Version Installed on the Device

Here is a quick video to show you how easy it is to setup a one-touch app for your process on the VersaLink.

Below you will find the instructions from the AltaLink knowledgebase.  The instructions for the VersaLink are a little bit different. For full written instructions please navigate over to the support website and enter the model of the printer you are using. Then search on “one-touch”. 

AltaLink – Creating a 1–Touch App:

Note: To use this feature, log in as a system administrator.

  1. Login as System Administrator at the Control Panel.  Refer to Login or Logout as System Administrator from the Control Panel
  2. At the printer control panel, press the Home button.
  3. Touch Log In. Type the User Name using the keypad, then touch Next. Type the Password using the keypad, then touch Done.
  4. Touch the app required.
  5. Select the job settings.
  6. Scroll to the bottom, then touch Create 1–Touch App.
  7. Touch Save as 1-Touch App.
  8. Touch the entry field, then use the keypad to enter a name. Touch Next.
  9. Touch a color scheme option for your 1-Touch App, then touch Next.
  10. Touch an icon that best suits the 1-Touch App that you are creating, then touch Next.
  11. Touch the Enter App Instructions entry field, then use the keypad to enter instructions for users. Touch Next. When the 1-Touch App is selected, the instructions appear at the top of the screen.
  12. Touch the app settings required.
    • Allows Editing Quantity: Use this option to allow users to view and update the quantity.
    • Show Feature Settings: Use this option to display a summary of the features programmed for the 1- Touch App.
  13. Touch Done. The 1–Touch App appears on the Home screen.
  14. Logout of System Administrator mode.  Refer to Login or Logout as System Administrator from the Control Panel

Check out this time saving feature. The one-touch app can add even more simplicity to your work processes.

Cloning Your Way to Convenience

With Xerox cloning feature you will get an exact duplicate. No, you won’t get a second printer or multifunction device, it is not that kind of cloning!! However, you can conveniently get all your settings to a second like printer and save that time usually used to set up all the settings. The clone file is created and saved with the extension .dlm (downloadable module).

The file can also be useful as a backup or restore file for your machine. If your machine has to have service or some other process that would clear the settings the clone file will give you a way to restore your settings, address books, etc. for your product. Having a backup can save you a lot of time and frustration if you ever lose your settings.

The clone printer feature can also be used to clone configuration settings from a source printer to a destination printer(s). The clone feature will create a file script that can be used to configure another printer(s) or multifunction device(s). All printers must be the same model and have the same version of software for the file to be accepted. The System Software version must be the same on the printers, on the machine the clone file is being created on and the machine(s) that is being cloned. Print a System Settings (Configuration) list and make sure the System Software versions are the same. Please refer to the support site for your machine for instructions on printing that report. This report may also be needed to get the IP address of the printer.

Groups of settings are available to clone, depending upon the features on the machine and the optional features installed on the source printer. The following conditions affect the cloned settings:

  • Only options installed and configured are displayed on the Embedded Web Server or CentreWare Internet Services cloning window. For example, the Network Scanning option displays only if it is installed on the source machine.
  • Items that are unique to a configuration are not included in the clone file. For example, the setting on the TCP/IP page for IP address / Host Name is not included in the clone file.
  • Cloned features of a source printer will not add a feature to another printer if not already installed.

Cloning is a significant time and energy-saver.
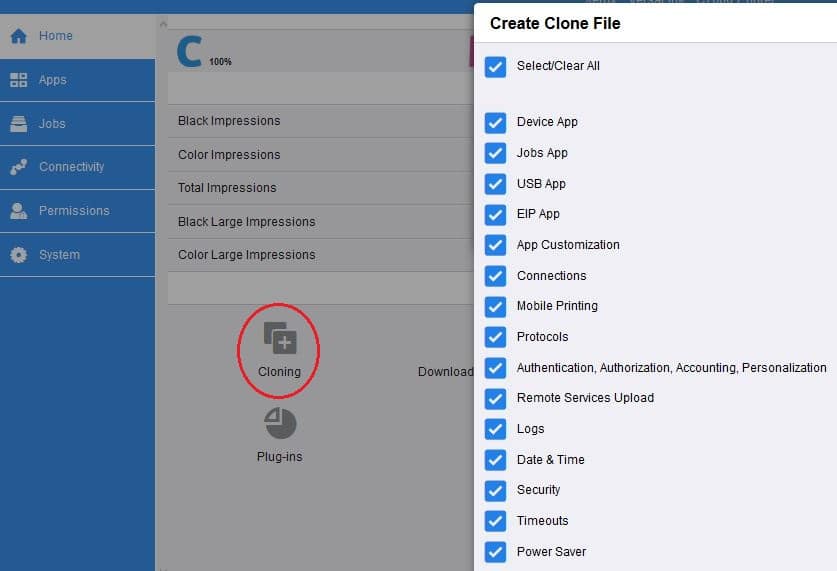
Below is an example of a cloning screen from the Embedded Web Server. To see if your machine supports cloning, refer to your user manual or go to the support page for your machine and search on “clone”. Your screen may look different as your model and features may be different from the machine in the example.

Clone Screen Example

9 Things to Check When Your Xerox Printer Won’t Print

My Xerox printer won’t print! We hear this statement at the customer support centres and on the Community Forum but that statement does not tell us or anyone that is trying to help you what they need to know. So let’s take a look at some things to check that might help narrow down your focus to what might be causing the no print. You might be asked about these check points by customer support or you might want to go through this list first before you contact support.  Make sure to read them all, no skimming or skipping!!

Check List for Won’t Print
  • Is there an error code or fault message? If so search on the code or message in the support pages for your printer.
  • Do the other functions work (copy, fax, scan) if your printer has those functions?
  • Can you print a configuration or settings report? You can find instructions for printing this internal report in the manual or support page for your printer.
  • Check all cable connections and make sure they are secure and tight on both ends.
  • If the printer is connected to the network, can you ping the printer? See the instructions for pinging the printer and how to interpret the results on the support pages for your printer just search on “ping”.
  • Does print fail on more than one document and different programs? It could be the document or something with the program you are using if it is specific to one document or program. Try another document and or program to see if the problem is specific to one document or program.
  • Do you have the latest driver available for your printer? You can check this by navigating to the Drivers & Downloads page of the support site for your device.
  • If you have not already tried, PO/PO the machine. PO/PO is power off and power on. Now when you do this make sure that you leave the printer off for 60 seconds. Please also make sure that the machine is plugged into the wall outlet and not an extension cord. Powering off and on instructions can be found in the support pages for your printer. Some printers have two power buttons so please make sure you fully power off the device completely.
  • If the problem still has not been solved then you should uninstall the driver completely and then reinstall the driver. Instructions on how to uninstall and reinstall the driver are available at the support pages for your printer.

These are the basics that we look at when we see the issue of “will not print”. If none of the items above help in your situation then it may be time to go to the Forum and ask for help or contact your local support centre.by phone, email or chat, if available. Be sure you provide as much information as possible on your set up, operating system, driver version, type of connection and what, if anything, has changed since the last time it printed properly.

I hope this list has given you an idea of what to look for and where to start when your printer does not print. Every situation is different so these are general things to look at or try. For more specific information search the support page for your device, contact your local support centre or post your situation on the Community Support Forum.

Need a Proofreader? One Is As Close As Your Xerox Multifunction Printer

It is getting to that time of the year when the last few months of the school year start to get crazy busy. I thought I would share with you a service / app that might help some of the educators out there and anyone that has to create, review or read text.  The Xerox Proofreader Service app is available in the Xerox App Gallery.

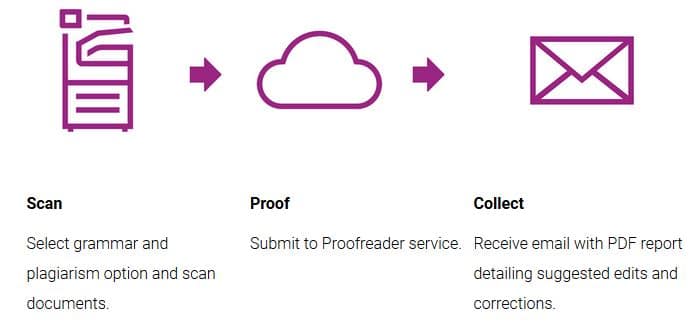
The Xerox Proofreader works with your multifunction printer (MFP) and gives you access to a tool that checks for plagiarism as well as checking for spelling, grammar and style.  A report is generated that suggests corrections.  The report can be printed or emailed to the user and all of this takes place right at the multifunction device.  The service is great for teachers, students and communication professionals from any industry.

How Does it Work?

The service requires a MFP with print and scan capabilities and the EIP version 3.5.0 or greater.  Currently the app supports English language only.  However, you could use the Translator App we blogged about earlier to translate to English and then use the proofreader.

With the proofreader service, you can scan in a hard copy document or you can upload an electronic document to the web portal at https://xeroxproofreader.com for feedback. A third method is available as well; you can type text directly into the writer’s tool of the web portal, checked and then exported as a PDF or Word document. The results are fast for whichever method you use, giving you time to focus on content instead of corrections. Whether the document is scanned in at the MFP, uploaded, or typed in to the portal the report will be available in PDF format.

To find out more about the Proofreader app navigate to the Proofreader site.  You can find support and a FAQ at the support site for the proofreader.  You can also review the Proofreader Quick Start Guide.  In the App Gallery, you can try the proofreader and review the subscriptions available.

Give it a try and see if you can benefit from having a proofreader at your fingertips.

Power On – Electrical Issues and Your Printer

The Xerox Printer and Multifunction Printer have not gone wireless in regards to electricity, and they can’t be run solely on batteries. They need consistent reliable power to work normally. We continue to get questions about odd behavior at power up, lockup or power cycling and some of these issues are caused by insufficient power (voltage) to the machine.

Some of the symptoms that may be related to electrical / power issues are the machine will not power on, the machine hangs during start-up, the control panel is locked up or not responding or the machine continues to turn itself off and back on.  These are just a few of the symptoms that might be caused by electrical / power issues.

Let’s look at a few of the recommended steps to try to decide if power or a lack there of is causing the symptoms you are seeing.  We will start from the easiest and work our way up.

Make sure the power switch or switches are in the on position.  Some of our machines have two power switches and both switches should be checked.

Often when you have an issue with your machine a simple power off power on or POPO (pronounced Poe Poe like the poet Edgar Allen Poe), is all you need to clear an error. Power the machine off for 60 seconds and then turn the machine back on.  Reboot could take up to 10 minutes depending on the machine.

Isolate the machine

To verify that the problem you are seeing is not being caused by the printer, each cable should be tested.  To test follow these steps:

  1. Power OFF the printer.
  2. Disconnect all cables from the back of the printer, except for the power cord.
  3. Power ON the printer.
  4. If the printer does power ON properly, power OFF, plug-in one of the cables, and then power ON. If the printer does not power ON properly the problem is with the cable, network or peripheral.
  5. Repeat this process of elimination with the other cables to determine the source of the printer not powering ON.
  6. Replace faulty cable.

Check the power source / outlet the printer is plugged into

  1. Plug the printer directly into another, known-to-be-good, wall outlet as a test. For testing purposes, do not plug the printer into a surge protector, power strip or uninterruptible power supply (UPS). If the power-up problem only occurs when the printer is plugged into the surge protector, power strip, UPS or one specific outlet, then the problem is with that device or outlet.
  2. Make sure that both ends of the power cord are plugged in all the way. Examine the power cord to make sure there are no nicked or exposed area, if there are then try another power cord.
  3. Disconnect devices that share the same power circuit (circuit breaker) as your printer, especially if the outlet you are using has heaters or motors that cycle on and off. For example, laser printers, copiers, coffee pots, or space heaters. When these types of devices are cycled up or on, they may cause a brief power brownout (voltage dip), which can cause the printer to fail its power-on test.
  4. If possible monitor the line voltage. To see the voltage / electrical requirements for your machine navigate over to the support page for your machine and search on electrical.  You showed find an electrical specifications solution that will show the voltage the machine requires and all the electrical requirement.

If the problem continues to occur after following all these solutions/ suggestions then it is time to have someone look at the machine.  Contact your local support centre for further assistance. I hope this information will help you if or when you ever have a power issue.

Device Communication Security Upgrade FAQs

FAQ: Everything to know about the move to SHA2

In accordance with industry standards, effective May 25, 2019, the SHA-1 security certificate will expire, and its successor (SHA-2 certificate) will be required to authenticate devices’ direct communication with the Xerox server.  This communication pathway provides that data needed for services and support, including Automated Meter Reads (AMR) and Automated Supply Replenishment (ASR).  The list of affected products and more information about this change is available in the Security Bulletin found at www.xerox.com/sha2. The affected machines will require a software upgrade to obtain the SHA-2 certificate, or will need to use a device manager application going forward. Continue reading to find answers to the most frequently asked questions.

  1. Why is the upgrade to SHA-2 relevant to me?

If you rely on services such as AMR and ASR, your services could be impacted if action is not taken.

  1. Why is this upgrade happening?

Security is important to Xerox.  Authentication must be made using SHA-2 certificates to comply with the latest data transmission security practices.

  1. How do I know if my machines are affected by this?

If your machine communicates device direct, and its software is below the minimum SHA-2 compliant level specified in the security bulletin,, then it is affected by this upgrade.   Run a configuration report from your printer to find its current software level.

  1. How do I ensure my services are not interrupted?

Perform the recommended software upgrades to obtain the SHA-2 certificate for ongoing device-direct communication, or install a Device Manager.

  1. How can I determine which communication pathways my device uses for AMR and ASR?

You have a few options.  When checking, please note that “Proxy” communication is synonymous for device manager (e.g. XDA), and “direct” indicates device-direct communication.

  • If you have a MySupport Portal account setup, you can view your Communication Method(s) there.
  • Search by serial number using the Device Connectivity Lookup Tool website, at https://app3.support.xerox.com/GRSDeviceData/ and view the Communication Method column.
  • For device direct: check the communication status on the printer’s web UI.  Consult the Xerox online support assistant for product-specific instructions.
  • For device manager: confirm the devices in question are showing up in the list of Printers in your XDA/XDM application.
  1. Why are some of my Xerox products currently using a SHA-1 certificate?

For many years, Xerox products and software updates have been adopting the SHA-2 certificate.  Some machines at their original or early software versions still have the SHA-1 certificate.

  1. I use a device manager (XDA, XDM, CWW). Am I affected by this?

Device manager communications are not affected by this change.  However, if your machine also currently communicates device-direct and is at the SHA-1 certificate level, the device-direct communication will be impacted.  The device manager will sustain automated billing and supply replenishment.

  1. What will happen if I do not upgrade my device software to the SHA-2 level?

You may see a communication failure alert on the machine.  Xerox will not receive the meter reads and supply levels via the device-direct pathway.  If a device manager (XDA, XDM, CWW) is not being used as a secondary communication method, the automated services such as AMR and ASR will be interrupted.

  1. Is a service technician needed to upgrade the software and obtain the SHA-2 certificate?

No. The upgrades are all customer-installable.  If assistance is required, a Global Digital Support agent can help.

  1. What should I do if I have many machines that are affected by this?

Consider using a device manager (XDA/XDM) now to immediately prepare for this, and then upgrade the device software packages overtime to apply the SHA-2 certificate and allow device-direct to continue, wherever possible.  XDA/XDM will work concurrently with your current device-direct connections, and will continue on after the SHA-1 expiration date.

  1. Why should I upgrade software to continue device direct, if I’m going to use a device manager?

Continuing device-direct will ensure your printer’s diagnostic data is sent to Xerox, which is useful for troubleshooting.


A Plethora of Production and Press Playlists

Calling all Production and Press users and operators, have you been to the Xerox Support YouTube channel lately?  There are currently well over 100 videos pertaining to production and digital press printers available to you. Everything from clearing jams to color calibration to information on replacing consumables. Most of these videos are concise and average from 40 seconds to 3 minutes.  The videos will walk you through many processes and procedures on your printers.

 List of Production Printers with Playlists

  • Xerox® Color C60/C70 Printer
  • Xerox® Color 800 1000
  • Xerox® D95 D110 D125 D136® Black and White Copier Printer
  • Xerox® iGen® Press
  • Xerox® Iridesse®
  • Xerox® Nuvera®
  • Xerox® Versant® 80 Press
  • Xerox® Versant® 80 180 Color Press
  • Xerox® Versant® Presses

Here is a sample of a video for the Iridesse about density uniformity.

Our goal in support is to get the answers to your questions closer to you and available to you day and night in the best format for you.  You can find written instructions in the knowledgebase or the documentation for your device.  You can find those resources at the Xerox support site.

You also have the option of posting your question on the Xerox Customer Support Community forum.  You can search the forum for answers as well.  We are seeing more production and press questions posted.  We would like to see more from the production and press community and while you are on the forum see if there is a post for which you can offer a solution.  Be part of the teamwork on the Customer Support Forum.  As they say “Teamwork makes the dream work.” – John C. Maxwell.

One more place to find useful information about your production or press printer is on the Xerox YouTube channel where you will find videos about specific applications and case studies from companies currently using the products.

Leverage all of this information to your advantage and let us know what else you would like to see.  Simply leave me a comment below and I will see it gets in front of the right teams.