Introducing the Xerox Easy Assist App

You’ve eagerly awaited your new Xerox printer or multifunction printer and it has finally arrived. Next comes the task of unboxing the device, setting it up, and downloading print drivers. It’s not always straightforward and can sometimes be confusing. Let us introduce you to the new Xerox Easy Assist App which makes install and setup quick and easy!

Easy Printer Setup

This new app provides a simplified step by step guided installation experience with easy print and scan driver setup. This means no more searching on Xerox.com for the right drivers for your specific printer model.

When you’ve started the process to install your printer, the printer’s setup screen will say: “Do you want to use a mobile app?” Select ‘Yes’ and follow the steps to acquire the App. Scanning a QR code will then pair the printer with your phone via WIFI Direct.

The instructions on the printer’s local user interface will be synchronized with the App to provide clear and straightforward guidance on the next steps to take.

After your printer setup is complete, select the ‘Set Up My Computer’ tab on the App to enter an email address to send links for downloading and installing the appropriate software.

Keeping you Productive

Now that you are ready to start using the app, stay efficient by monitoring your supply levels and easily reordering genuine Xerox supplies.

The app will automatically indicate when you are low on toner, which means you can simply select the ‘Reorder’ button, and the app will navigate you directly to your specific supplies.

And to remain even more productive, quickly browse and print documents from within the app, removing all the unnecessary steps you would usually encounter.

Instant Support

In the unlikely event you run into technical issues, you can resolve them quickly with real-time access to support services.

The app provides simple resolution steps based on your printer fault notifications, this includes access to live chat and self-support articles instantly.

Total peace of mind

Feel at ease by preventing unauthorized user access through your device settings. Select ‘Device Settings’ and easily manage printer admin passwords to help keep your device secure.

How to find the Xerox Easy Assist App

Download the app today from the Apple App Store and Google Play Store.

For device compatibility, please visit the Xerox Knowledge Base

Connecting Printers for Remote Services – Direct Device or Device Manager?

We live in a highly connected world, from garage doors you can open and close from afar using a phone app to pet feeders you can program while on the beach in Fiji. Connected devices are designed to make our lives easier and less stressful.

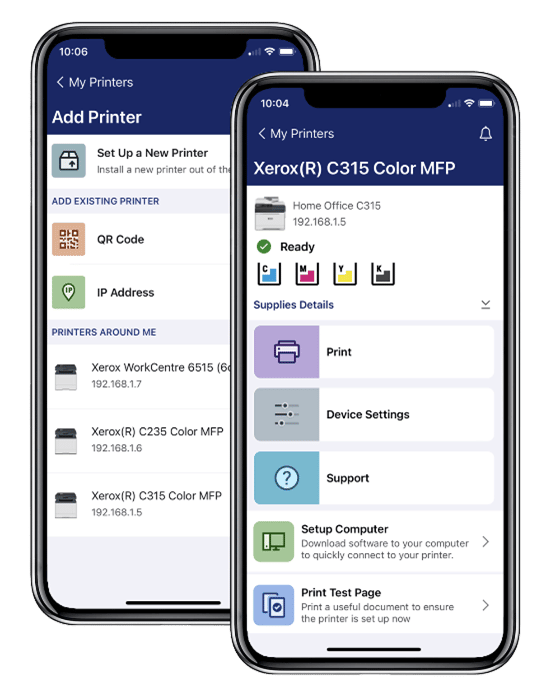
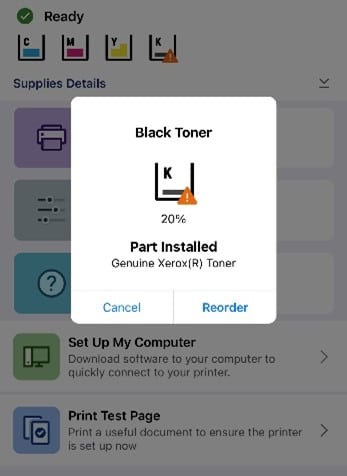
Connecting your Xerox printers and multifunction devices to send data to Xerox is another example of connecting for simplicity and efficiency. Having your printers send their meter reads, supplies levels and diagnostic data relieves you of the task and provides Xerox with a better ability to serve you.

There are two main options for connecting your printers and multifunction devices for remote services.

DEVICE DIRECT

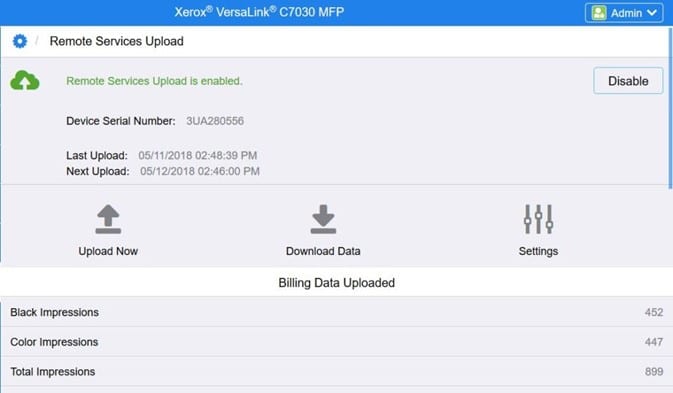
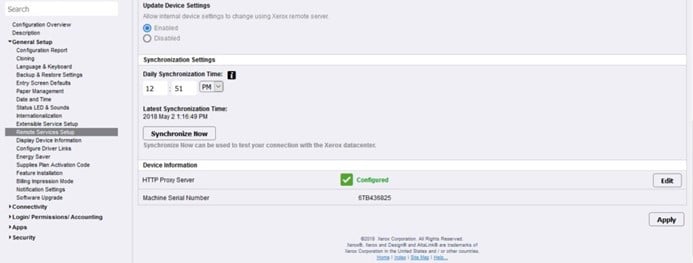
The first is termed ‘device direct’ which means that the printer itself has the capability embedded in its firmware to transmit the needed device data elements to Xerox. Many Office printer models are ready for data transmissions upon installing the printer. Depending upon your network configuration or the configuration of your company’s firewall, there may be some additional steps to follow at the printer’s embedded web page to make the capability complete and activated.  These steps are found in the printer’s system administrator guide at www.xerox.com/support. Search on your printer model and look for the related documentation.

Here are links to some of the system administrator guides:

AltaLink® printer models

VersaLink® printer models

PrimeLink® C9065/C9070 Printer

DEVICE MANAGER

A device manager is a software application that is downloaded onto a PC (or a server) and runs in the background. It will ‘discover’ the printers on the same network and provide a user interface for managing the discovered printers and viewing supplies levels and other printer information. The device manager will poll the printers at a set interval and compile the printers’ data to send as one package to Xerox. Device managers can be useful where there are large fleets of printers, but they are also applicable for small numbers of printers.

Note that if the PC is turned off or belongs to someone who shuts their PC down while on vacation, the data transmissions will stop during that time. To ensure uninterrupted data transmissions, both connection methods may be used at the same time.

MAKING THE CHOICE

You may be wondering, “how do I choose the method of connecting for my printers?” There are a few things to consider.

TYPE OF CONTRACT

First, does your contract with Xerox include managing your printer fleet for you? For these contracts, your account representative is most likely recommending a device manager application, such as Xerox Device Agent (XDA) or Xerox Device Manager (XDM), to provide the mechanism for delivering device data to Xerox on a regular basis. If the contract includes managing printers from manufacturers other than Xerox, a device manager application is the only option for the non-Xerox models. Bear in mind that connecting the Xerox printers via the ‘device direct’ method may be recommended as an enhancement to the device manager solution.

If you don’t have a fleet management services contract, and instead have a traditional maintenance contract which includes meter-based billing and/or supplies and support, you have the option of either method of connecting, or even both at once if you so choose. If your Xerox printer population is large, using the Xerox Device Agent device manager may be a good option for you, as it will discover the printers on your network and provide a quick way to set them up at once. Note that the maximum number of printers on an XDA instance is 2,000.

PRODUCT CLASS

The next consideration is the type of printer you need to connect. For production class printers, the device direct method is the only option available as they are not compatible with device managers. There are exceptions to this. Most entry level production printers are compatible with device managers and do have the choice of either method.

For more information regarding which printer models are capable of which method of connecting, please see this chart on xerox.com. Note that on this chart “XDA -lite” is an example of a device manager used for traditional service contracts. If a printer model is compatible with XDA-lite, it is compatible with similar device managers.

For security related information on both methods of connecting, please read the Remote Services Security Whitepaper. Additional information may be found at www.xerox.com/remoteservices.

Whether it’s by the device direct method of connecting, or by device manager, we recommend taking advantage of automated remote services such as automatic meter reading (AMR) and automatic supplies replenishment (ASR). Experience how they simplify your Xerox printer ownership!

Happy Thanksgiving

Happy Thanksgiving from Xerox Support to our customers in the U.S.! Thanksgiving is a time to reflect on what we are thankful for, including the people in our lives. We are thankful for you, our customers, and the opportunity to serve you for your printing and workplace needs.

It’s rewarding to know we were able to provide what was needed to resolve a question or issue. Whether it’s the resources we provide at www.xerox.com/support such as online knowledge solutions, the Customer Support Forum, and drivers and downloads, or the instructional videos at our Xerox Support YouTube channel, it’s gratifying to be of assistance to our many customers.

It is our aim to help our customers’ experiences with Xerox products be successful. Thank you for allowing us to serve you. We look forward to continuing to support your printing and workplace needs!

Greeting Cards, Calendars, and More

We are fast approaching the holiday season. Thanksgiving in the U.S. is just around the corner.  Soon we’ll be celebrating Hanukkah, Christmas, Kwanzaa and the New Year. It’s an exciting time and a busy time.

Let us take some of the pressure off with the myriad of resources at our Small Business Resource Center. There you will find templates for greeting cards, as well as customizable coupons which would make great gifts for loved ones. Using these templates is quick and easy and the printouts look like you spent a lot of time creating them.

The Xerox 2023 Calendar is also on the Small Business Resource Center site along with calendars you can personalize. With 2023 so close at hand, now is the time to start marking your January calendar for that day at the spa you will need after the rush of the holidays.

But wait, there’s more! Other templates available are inspirational posters, flyers, business templates, education templates, certificates and more. All of these templates can be printed on your Xerox printer or multifunction device.

Be sure to check out the template site and see which items will work for you. The Small Business Resource Center is a wonderful source of templates for all types of business and education applications, for large and small businesses alike. There’s something for everyone!

Xerox Printers and macOS® Ventura

Apple Inc. recently released version 13 of their operating system. Xerox offers a wide variety of print drivers for the newest operating system from Apple, the macOS® Ventura.

The Xerox® product compatibility document lists various Xerox® Office and Light Production products regarding the Xerox® Driver compatibility and availability. The table refers to a compatibility level for each product. It will be updated periodically as Xerox releases new macOS® Ventura-compatible device drivers.

This document is posted on the Xerox equipment compatibility with new operating systems page. There are 5 compatibility levels.  Many printers will have a ‘1’ in the compatibility level column. This indicates drivers which support the new operating system are available for this product. 

Driver Available

Drivers for the new macOS are found on the support pages for the printers or multifunction devices.   To find the newest drivers, navigate to the Xerox Support and Drivers page for your model.  Make sure to choose your printer configuration, if applicable. Then select the macOS® 13 Ventura operating system from the operating system drop down menu. Select ‘apply filter’ to see available driver(s) and proceed to install the driver. 

Important Note: Some features in Xerox Print Dialogs are missing on macOS 13 Ventura

Issue

On macOS 13 Ventura, Apple has changed how Xerox features are accessed.  The print dialog has been completely redesigned and the features are listed vertically.  However, due to all these changes, Xerox has identified an Apple issue on macOS 13 which results in missing Xerox features if driver version is 5.10.0 (or prior).

Solution

Apple is working on a fix for this issue in a future update of macOS 13.  Meanwhile, Xerox has found a work around for this issue and posted updated driver version 5.11.1 (or later). In the event that you experience this issue, upgrading the Xerox drivers to version 5.11.1 (or later) from Xerox.com will resolve the issue. When this issue is fixed in a future update of macOS 13, Xerox’s work around will continue to work.

Driver Not Available Workarounds

If the compatibility level column indicates a ‘2’, that product model does not have support for macOS® 13 Ventura. For these instances, AirPrint and Scan to Email may be used as a workaround.  Please see the article Macintosh OS Driver is Not Available in online support for additional information.

If you have questions, please search the online knowledgebase for your product, reach out to your local support centre or post a question on the Xerox Community Support Forum.

Changing Back to Standard Time

Standard time is coming back this weekend to most of the United States and Canada, with the exception of Hawaii, most of Arizona, the Yukon and parts of Saskatchewan and British Columbia. The first question that comes to mind may be: does that mean one more hour of sleep, or one less? The good news is that we’re at the time of year when we gain an hour of sleep. Set your clocks back one hour at 2 a.m. on Sunday November 6th and enjoy the extra time!

In Europe the change to standard time was done a week earlier on Sunday October 30.

What does this have to do with Xerox printers? Time matters to Xerox printers and multifunction devices. They need to be set to the correct time. Otherwise, it can cause confusion.

Times may be incorrect on faxes, activity reports, banner pages and other time sensitive reports and activities. It is possible that printing will not work. If the printer is connected to a network and the printer and network are not set for the same time, it may cause the printer to not print.

Some devices will automatically handle the changes from daylight savings time and back to standard time if they are set up that way. For example, the instructions to set up daylight savings time on your Xerox® B225 or B235 printer are found here. Search on “daylight” in the online support for your printer model to learn how to set the daylight savings time option if your model includes this feature.

Many printers and multifunction printers have the Network Time Protocol (NTP) or Simple Network Time Protocol (SNTP) feature. This feature synchronizes the internal clock of the Xerox device over a network connection. SNTP or NTP must be enabled and configured at the device for this automatic feature to work.  For instructions on enabling SNTP or NTP, if available on your device, navigate to the support pages for your printer model and search on “NTP”. 

If you see that the printer time is incorrect and you need to change it, you can find instructions in the support pages for your printer model. Here are some quick links to help you find the instructions for the following models:

After enjoying your extra hour over the weekend please remember to check your printer or multifunction device on Monday November 7th to make sure it is set to the correct time.

Scan to Email and Microsoft Outlook

Are you using a Microsoft Office 365/Outlook account on your Xerox printer for scanning to email?  If so, changes that were made by Microsoft beginning October 1, 2022 will impact your ability to send email from your printer. These changes by Microsoft will affect most multifunction devices that email regardless of printer manufacturer. This will only affect you if you use Microsoft Outlook accounts in the printer. 

The Scan to Email Issue

Microsoft Office 365/Outlook is rolling out a two-step verification process to increase account security. An alternative to the two-step process is using the Microsoft Authenticator App. This means that using your username and password is no longer sufficient.

However, on printers (of any manufacturer, not just Xerox), the scan to email app is generally not designed for a two-step verification process. The solution is to follow Microsoft’s instructions for generating a one-time App Password for devices such as printers. An App Password is a long, random passcode that can be provided once to give an app or device permission to access your Microsoft Outlook email account.

Without the Microsoft Office 365 / Outlook App Password, the printer will cease to send emails, causing the user to believe there is an issue with the printer. 

The Suggested Fix

To setup the Microsoft Office 365 / Outlook App Password see Microsoft’s How to Use Two-Step Verification help article on this topic. See also Microsoft’s Using App Passwords help article.

Once the App Password is created, enter the password (without spaces) in place of the current scan to email SMTP authentication password using CentreWare Internet Services (CWIS). It can then be used by the printer to authenticate the email and enable scan to email functions.

Note: if you don’t have access to modify email settings or administrator (Admin) rights on your device please contact your System Administrator or IT department.

The process to update the authentication can vary depending on the Xerox printer model.  if there are any questions about where the password is input in the printer, search online support for your printer model. 

If you make the app password change but continue to have an issue with scan to email on your Xerox printer, please contact technical support for additional assistance.

How Xerography Came to Be

It’s amazing to think about how much we rely on xerographic technology and the ability to produce an exact copy at the touch of a button. It’s so ingrained into our lives and work processes; we can’t imagine being without it.

Xerography, which started the office copying revolution, was born in a small laboratory on October 22, 1938. It was the inspiration of a patent attorney, Chester Carlson, working in his spare time on his ideas for a duplicating breakthrough. Xerography means ‘dry writing’ and was the first process for creating a duplicate in a dry process without the use of chemicals.

The first image was a handwritten note that simply read “10-22-38 ASTORIA” (see picture). This copy is preserved in the Smithsonian Institution.

Xerography is based on two natural phenomena: that materials of opposite electrical charges attract and that some materials become better conductors of electricity when exposed to light. Carlson invented a six-step process to transfer an image from one surface to another using these phenomena. The six steps are charge, expose, develop, transfer, fuse, and clean.

Visit Chester Carlson and Xerography or download the Story of Xerography to learn more about the details of each step and how it was discovered. It’s an interesting story of struggle and rejection. And of a company named Haloid Xerox, later to become Xerox Corporation, which risked it all when it had little in order to see xerography succeed.

While xerography was invented in 1938, it wasn’t until 1959 that the first convenient office copier using xerography was unveiled by Haloid Xerox. By the time of Chester Carlson’s passing in 1968, the whole world was making copies at the push of a button.

To learn more about innovations that have evolved from xerographic technology, visit Innovation at Xerox.

Notice as you go through your normal workday, how xerography helps you and your business every day. Thank you, Chester Carlson!

Save Time with Remote Services  

There’s no time like the present for saving time. Why not set up your Xerox devices for remote services and allow them to take care of routine tasks that you don’t have time for anyway?  Most Xerox product models can automatically send device data to Xerox and reduce the work involved in managing your printer or printer fleet.

Automatic meter reading automates the task of collecting and submitting meter reads to Xerox for billing purposes.  It makes the meter read process hassle free and less time consuming for you. Plus, the reads are always submitted on time. No remembering required!

Automatic supplies replenishment automatically orders certain supplies for your printer as they are needed.  You are less likely to be caught short without the supplies you need. The orders are based on actual usage as reported by the printer so there’s no need to store excess supplies. You will receive just the right supplies when you need them.

Xerox devices configured for remote services will also send diagnostic data such as alerts and fault codes when something goes awry. This greatly aids the support process. There’s less guesswork and no need to try to describe what is happening with the printer when it can report the details on its own.

Let’s look at how to set up these services on the VersaLink® and AltaLink® families.

To set up this feature on the VersaLink® family of machines:

To enable Remote Services:

  1. In the Embedded Web Server, log in as administrator, then click System.
  2. Click Remote Services Upload.
  3. To enable Remote Services Upload, click Enable.
  4. To send billing and supplies information from the printer, click Upload Now.
  5. To allow the printer to request data from Xerox, click Download Data.
  6. Click Settings.
  7. To synchronize the printer with the Xerox Remote Services datacenter, in the Schedule Upload area, type the time of day to upload the billing and supplies information. Use 24-hour format.
  8. To configure email notifications for remote services, in the Email Notifications area:
    • Select the events when you want to receive notification.
    • Type up to five email addresses to receive the notifications.
  9. Click OK.

To set up Remote Services on the AltaLink® family of machines:

Before you begin, if your network uses an HTTP proxy server, you will need to provide information about your proxy server in the steps that follow.

Configure Remote Services:

  1. Access the Embedded Web Server and login as System Administrator.
  2. In the Embedded Web Server, click Properties > General Setup.
  3. Click Remote Services Setup.
  4. For Remote Services, select Enabled.
  5. To allow the device to request software files from Xerox, for Remote Software Download, select Enabled.
  6. To allow the device to synchronize with the Xerox licensing server, for Feature Activation, select Enabled.
  7. To allow a Xerox remote server to modify internal device settings, for Update Device Settings, select Enabled.
  8. To synchronize the device with the Xerox Remote Services data center on a defined schedule, daily, for Device Synchronization Time, type the time.
  9. To verify communication with the Xerox Remote Services data center, click Synchronize Now. A status message shows the result.
  10. If your network uses an HTTP proxy server, to set or update your proxy server, for HTTP Proxy Server, click Edit and enter your HTTP proxy server information.
  11. Click Apply.
  12. Logout of System Administrator mode.

For more information about these features, go to the Remote Services page on Xerox.com where you can find more useful information and helpful links.  If you have additional questions, check out the FAQs for Remote Services that will answer many of your questions.

The Remote Services Security White Paper provides details to address any security-related concerns about remote services and outlines the security of the data transmissions and the ISO 27001 certified environment to which it is delivered.

Consider using remote services to save you time and energy. Just let your printer take it from here!

Please Confirm

It’s interesting the number of things we need to confirm in our lives. The notices we receive are constant: “Please confirm your email address.” Or, “please confirm you will be joining the family for holiday dinner.” It’s an accepted part of how we interact in society.

Even your Xerox printer would like you to confirm something! When a paper tray is opened on the printer, it will ask you to confirm what paper type, size and color was added to the tray. Why does it need this information? Let’s take a look.

Paper Size

The printer needs to know the size of the paper to avoid the following issues:

  • The application or the print driver may specify a specific paper size – An application (such as Microsoft Word) or the print driver may specify a specific paper size to be printed on. If the specified paper size is not loaded into the printer, or the printer does not know that it holds the correct size in a tray already, the job may be held for resources or generate a fault code.
  • Internal mechanics are set electronically for the loaded paper size – Tray guides that are not flush with the loaded media can result in paper misfeeds, print skew or paper jams. Be sure to adjust the tray guides to the size of the paper and confirm the corresponding size on the confirmation screen.

Paper Type

There are many paper types which can be selected such as plain, cardstock, recycled, lightweight cardstock, glossy and more. Why does the printer need to know what type of paper is in the tray? The type of paper provides an indication of the weight and stiffness of the stock, which is important to the printing process.

  • Heavier paper fuses at a higher temperature – A heavier paper weight means the paper has more mass. A paper type with more mass means that it requires more heat for the paper to heat up in the fusing process for the toner to properly bond with the paper. An incorrect weight setting can lead to issues with improperly fused toner, such as smearing or rubbing off.
  • Toner applied differently to different paper weights – Differences in paper weights require the toner be deposited using different charges when applying toner to the paper. Incorrect tray settings can cause image quality issues such as mottled prints, deletions, poor print resolution or light or dark output.
  • Internal mechanics adjust pressure and speed for thicker paper – As the internal mechanics inside the printer electronically set charge, heat and pressure depending on the paper weight setting programmed, an incorrect weight setting can cause issues with friction applied and the print speed of the paper as it passes through the printer. This can cause paper to skew, slip, misfeed or jam. It can also cause image quality issues or rapid wear to internal mechanics such as rollers.

Note: Use caution when printing on coated stock, photo paper or transparencies – Only use paper designed for laser printers in Xerox laser printer models. Using paper that is not designed for the correct printing process can lead to print quality issues and possibly jams. In the case of glossy paper, transparencies or labels, media designed for the inkjet process or offset printing may use plastics or other chemicals that have a lower melting point. These can melt during the laser printing process and damage the internal mechanics of the Xerox printer. For best paper performance, use only paper found on the Xerox Recommended Media List for your printer model.  

Paper Color

  • Color choice – Paper can come in a variety of colors, such as pink, blue, pastels or bright colors. Printing on paper with a color will affect image quality as it will offset color prints, and in some cases make text difficult to read.
  • The application or the print driver may specify a specific paper color – An application or the print driver may specify a specific paper color to be printed on. If the specified paper color is not loaded into the printer, or the printer does not know that it holds the correct color in a tray already, the job may be held for resources or generate a fault code.
  • Paper tray choice – Ensuring the paper color setting is set correctly will ensure the printer selects from the correct paper tray when you have a job requiring a specific paper color.

Please view this Xerox Support YouTube video regarding loading paper and confirming the paper tray properties.

Following these simple steps for confirming the paper size, type and color can reduce the possibility of paper jams, image quality issues and disappointment with the printed output. For additional information on paper specifications, loading paper and clearing jams, please search the online support for your printer model.

And, if you are so inclined, please confirm this article has been helpful to you by adding a comment below!