Today we will explore how to set custom size paper selections in your print driver for print jobs. You can save the custom size to be used repeatedly. Let us look at the general steps for creating and saving a custom size for paper in the driver. Your steps may be slightly different depending on the model of your Xerox printer or multifunction printer and the operating system (OS) you are using.
Depending on your machine you can print custom-size paper from Trays 1–5. Since custom size paper settings are saved in the print driver, they are available for you to select in all your applications. Please check your paper and paper tray specifications for information on the sizes supported for the paper trays on your machine. Custom sizes are most commonly printed from the bypass tray.
To create a custom paper size in the Windows print driver:
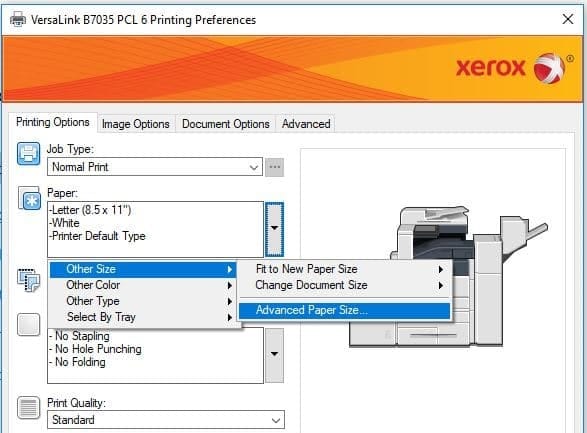
- In the print driver, click the Printing Options tab.
- Click on the [Paper / Output] tab.
- Click on the Paper pull-down menu and select [Other Size].
- Click on the Advanced Paper Size menu and select [New].
- Enter a name for the Custom Size in the Name field. NOTE: This name will be listed in the Paper Size list in the print driver.
- Set the Units. If the machine default is inches, select inches; if the machine default is millimeters, select millimeters.
- Enter the required height and width in the fields provided. The height and width may be set within the paper size specifications for your model printer.
- Then select the units inches or millimeters.
- Click on [OK] three times.
To print a document on custom size paper using a Windows OS:
- Open the file to be printed, and then select [Print] from the File menu. The Print window will be displayed.
- Select the Xerox printer, and then click on [Properties] or [Preferences].
- Click on the [Paper / Output] tab.
- Click on the Paper pull-down menu and select [Other Size].
- Select the Output Paper Size menu and select the custom paper size created before.
- Click on [OK] to close the windows and print the file.
To create custom paper size in the Apple Macintosh OS X (10.5 or Higher) driver:
- In the application, click File then Page Setup.
- Click Paper Sizes, and then select Manage Custom Sizes.
- In the Manage Paper Sizes window, click the plus sign (+) to add a new size.
- Double-click Untitled at the top of the window and type a name for the new custom size.
- Enter the height and width of the new custom size.
- Click the arrow to the right of the Non-Printable Area field and select the printer from the drop-down list. Or set the top, bottom, right, and left margins for User Defined margins.
- Click OK to save the settings.
To print a document on custom size paper using a Mac OS:
- Open the file to be printed, and then select [Page Setup] from the File menu.
- Select the required printer from the Format For pull-down menu.
- Select the required custom paper size from the Paper Size pull-down menu,
- Click on [OK].
- Select [Print] from the File menu. The Print window will be displayed.
- Select any required printing options.
- Click on the [Print] button to send the job to the printer.
Those are the basic steps; the steps may differ a little depending on the machine you are using. These instructions are presented to help you to know where to look in your driver for the custom setup. If you need further information or help, please search the online support for your model of machine or contact your local support centre.